MoCap
ARKit / Unity Face Capture
To record new ARKit driven MoCap, we use Unity's Face Capture app along with Unity's plugin Live Capture.
In order to use the ARKit Face Capture, you must use a device with iOS 14.6 or higher and ARKit face tracking capabilities.
Notes
FYI
- This plugin only works within the Unity Editor.
- Currently we only support Play Mode
Setup
The setup is based on the Live capture setup guide available here. Check it for more details.
Install
- Install Unity's Face Capture app on your phone.
- Install the Live Capture Unity Plugin via the Package Manager
- Ensure that both the devices are connected to the same network.
- Ensure that your computer’s network is marked as private so that your computer able to be discovered by the phone.
If Live Capture doesn’t show up in the package registry open the Package Manager, select Add package from git URL and add [email protected]
Preset Example Scene
There is an example scene that is already setup to capture a performance out of the box.
Run Example
- Open the DidimoLiveCaptureExample scene in
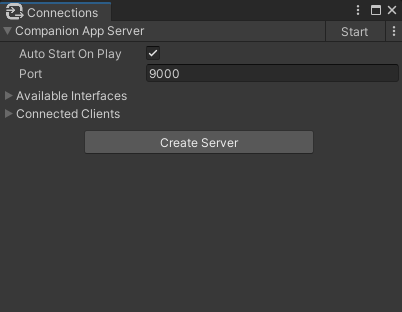
Assets/Didimo/Core/Examples/ARKitLiveCapture/DidimoLiveCaptureExample.unity- Create a Companion App Server; In the Menu bar, select
Window > Live Capture > Connections- Dock this Editor Window so you can easily access it later
- Select
Create Server > Companion App Server
If there is a notification to Configure Firewall, select that option to automatically add a dedicated inbound rule in your firewall so that you can connect apps from your local network

- Enter
Play Modeand make sure the server has started- Connect your phone to the server and see your didimo animate.
Recording an Animation
Now that you have your didimo animating, you can record an animation simply by:
- Pressing the record button on the phone
OR
- Selecting the TakeRecorder object from the hierarchy
- Pressing the Start Recording button in the Inspector window.
To finish recording, press the button again. By default, the animations are stored under Assets/LiveCapture/Takes or Assets/Takes. You can change this folder by selecting the TakeRecorder object from the hierarchy and changing the Directory field in the Inspector window. You can also use this window to set a name for the recorded files and add a description, so you can more easily sort through your animations and takes.
Recording Playback
While in play mode, to playback an animation, switch from Live mode to Playback mode in the TakeRecorder. Then select what animation you wish to review and press Start Preview.
If you are happy, you can also convert these Unity animations clips into Didimo JSON animations so that you can use them anywhere else more easily!
Converting to JSON files
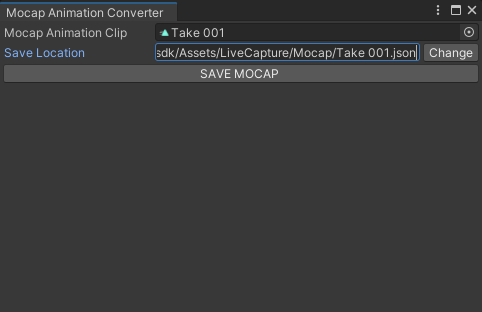
To convert animations into JSON files, we provide a tool called Live Capture Animation Converter that you can find on the menu bar, under Didimo > Tools > Live Capture Animation Converter.
Select the corresponding AnimationClip that you recorded, which should be a .anim file from Unity, and the location to save the JSON with the converted mocap data. Usually, the AnimationClip file is on the directory that you selected for the recordings on the TakeRecorder, inside a folder with the same name as you chose for the clip, and also has the same name.

Updated 9 months ago
