Popul8 Express Walk-through
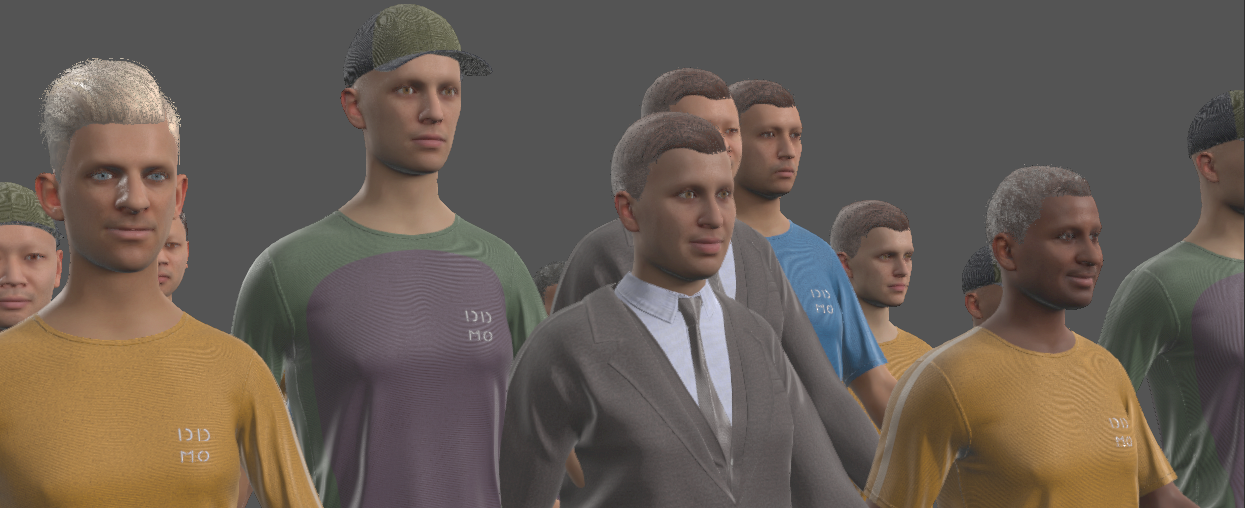
Popul8 Express automates character creation, streamlines asset fitting, and generates infinite variations instantly. All you need is a single 3D base character that aligns with your technical and artistic requirements - Popul8 handles the rest. It creates diverse head and body variations, automatically fits your existing asset library to every character, and generates rich, game-ready crowds that you can seamlessly import into your engine of choice.
Your specifications. Your topology. Your characters. Your assets.
This guide shows how Popul8 Express automates character creation while preserving your unique art style.
Concepts
Popul8 Express relies on six key concepts:
 Template
A Template is a 3D model of a character that defines all the technical specifications required for characters generated by Popul8 Express (e.g., topology, bone based rig, textures, art style, etc.).
 Shape
Shape
A Shape is a new character that adheres to the Template’s technical specifications (e.g., same topology, same rig, same number of materials) but features unique head or body variations.
 Deformable
A Deformable is any asset that complements a character, such as garments, grooms, accessories, etc.
 Animation
An Animation is an instance of the Template's rig with a key-framed sequence defining a specific motion or action.
 Crowd
Crowd
A Crowd is a collection of characters that adhere to the Template’s technical specifications. These characters feature variations in Shape and Deformables, and are generated based on predefined rules.
 Crowd Rule
A Crowd Rule controls how different Shapes and Deformables are distributed within a Crowd, following specific ratios. It allows fine-grained control over your Crowds.
Project setup
This section explains how to set up your project in Popul8 Express from scratch. If you're using the DemoExpress project you can skip these steps - we've already set them up for you . However, you can use this guide when testing with your own assets.
Creation
After installing Popul8, you'll see the Projects menu, where all your projects will be available.
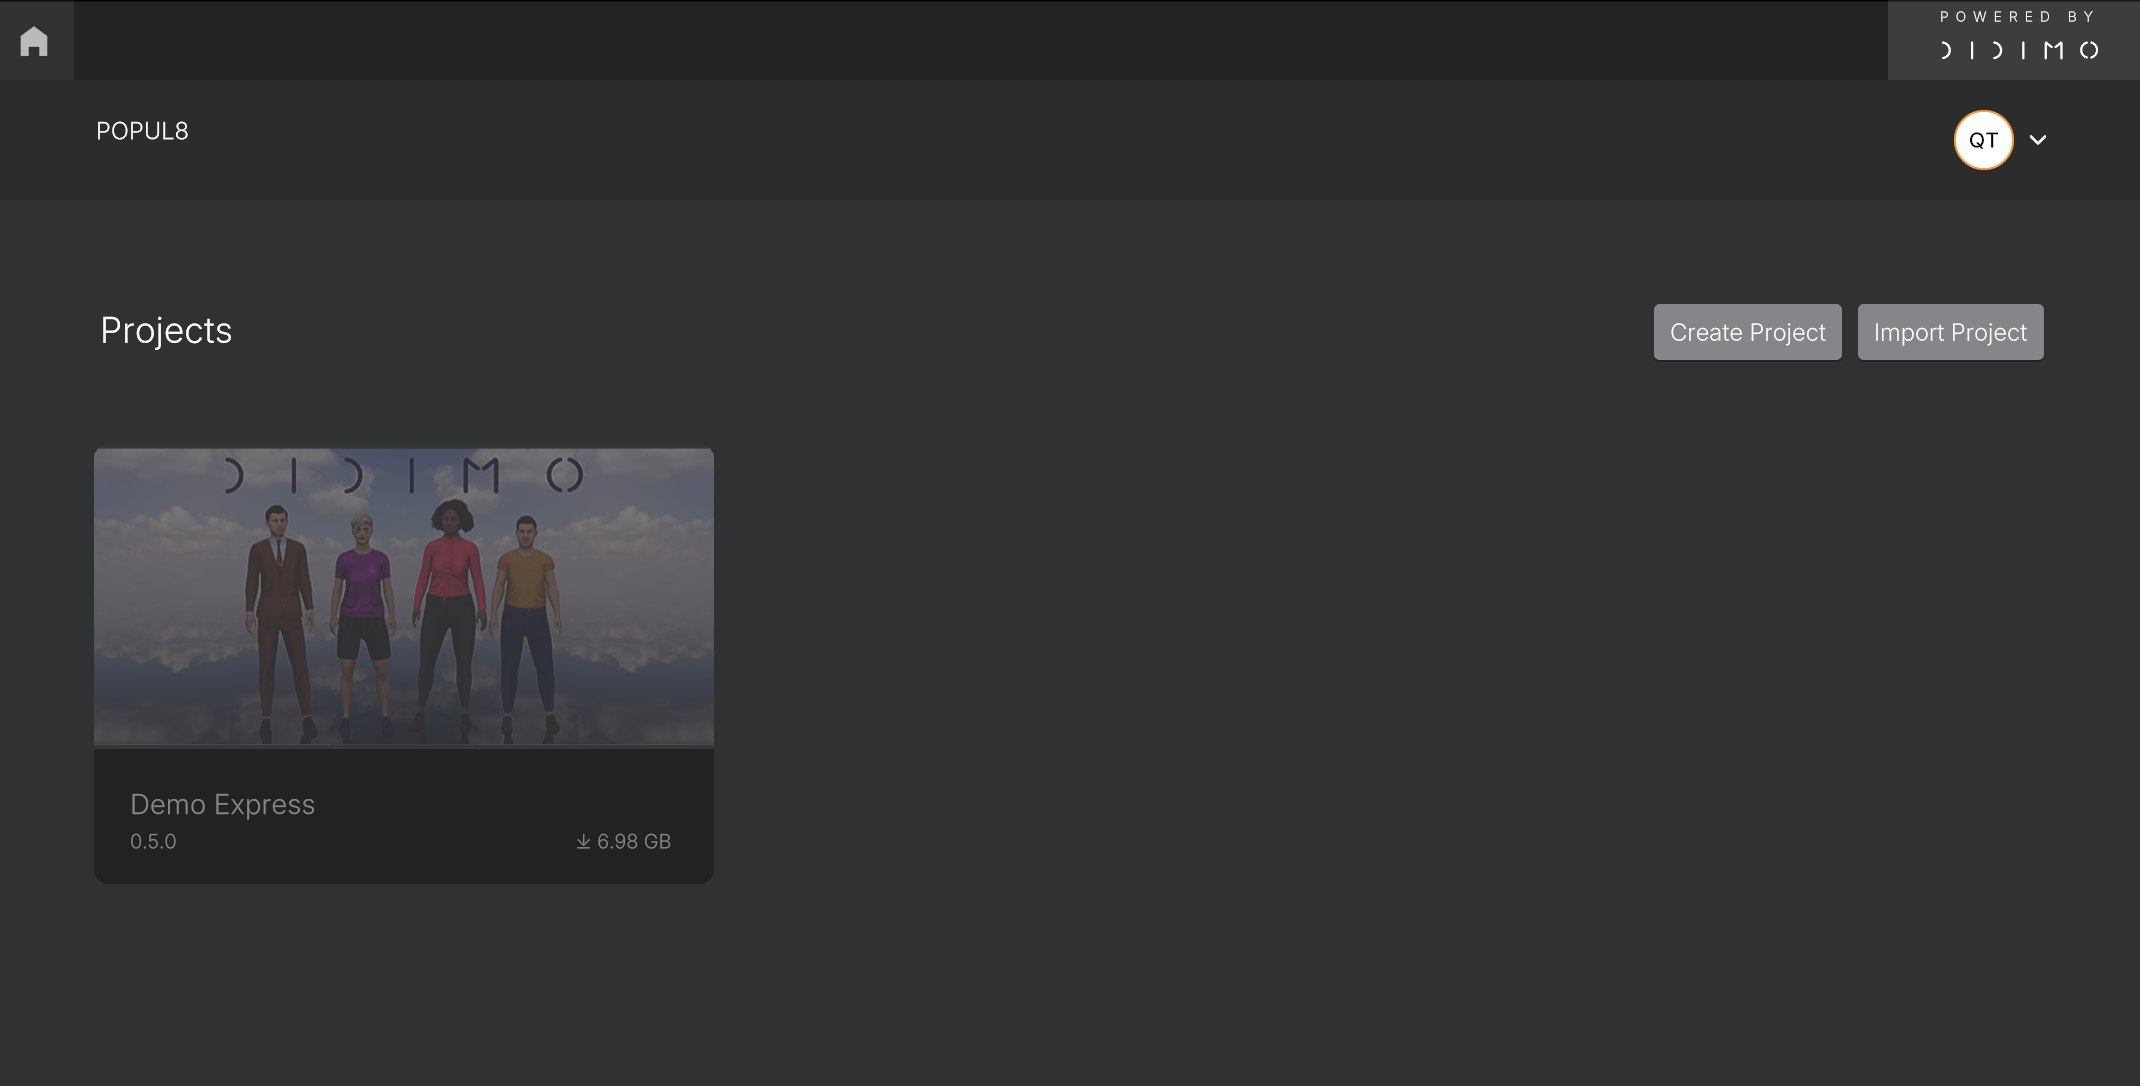
Projects menu.
To create a new project, click on Create Project, enter a name for your project, and choose the folder containing your assets.
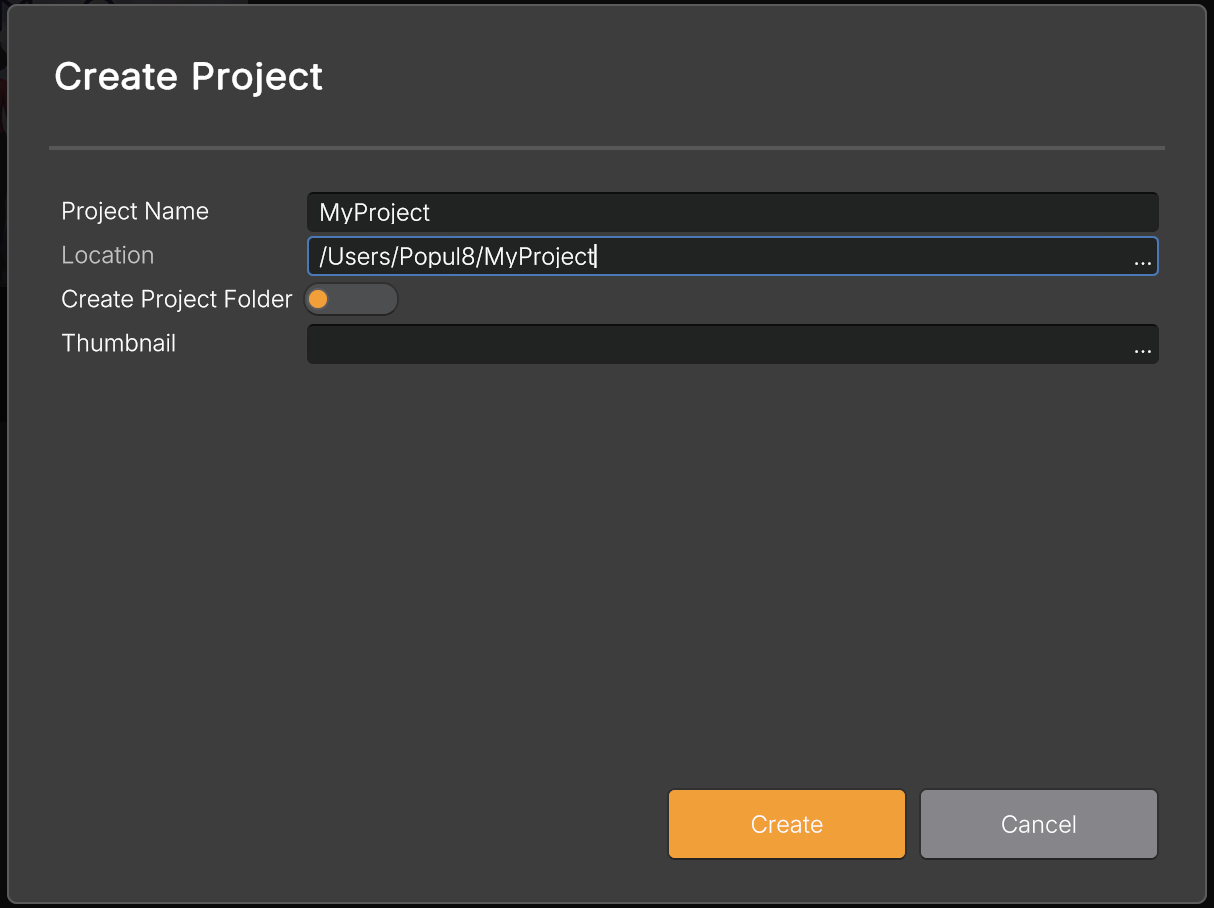
Creating a new porject.
For a smoother workflow, it's best to store your project in a location that also contains the assets you plan to import. We recommend organizing the Location folder into subfolders for better data management, including everything you’ll use - Templates with their textures, Shape variations, Deformables, and Animations.
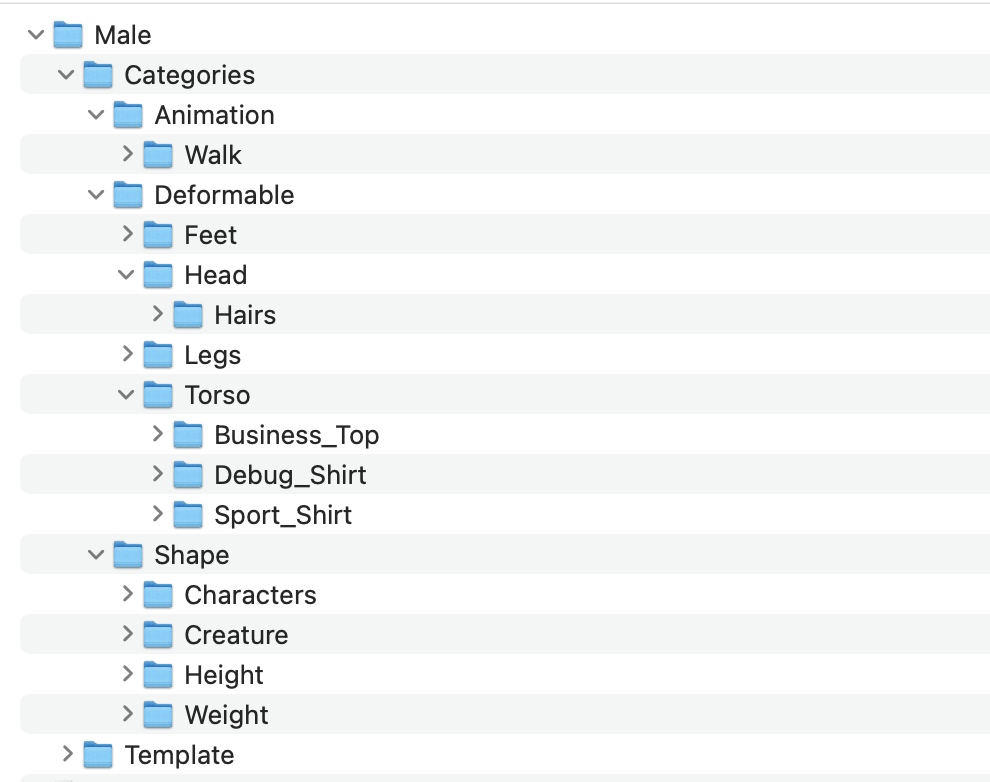
Suggested structure for asset organization.
Importing assets
Once your project is initialized, you can begin importing your assets. You have two options:
- Import files (Right-click → Import → File).
- Import folders (Right-click → Import → Folder).
All imported assets will appear under the Imported Assets section in the Project tab.
Supported file formats:
- 3D Models: FBX
- Textures: PNG, JPG and TGA - Type1, 2 and 10
Asset Types
In the previous step, you may have imported various asset types, such as Templates, Shapes, Deformables, and Animations. To ensure Popul8 correctly processes each asset and unlocks its full potential, you need to specify its type.
How to assign asset types:
- Browse the list of imported assets.
- Right-click an asset and select Convert To →[Desired Asset Type].
- Available types: Template, Deformable Of, Shape Of, Animation Of.
Since Deformables, Shapes, and Animations must be linked to a Template, we recommend setting up your Templates first before assigning other asset types.
Any Deformable linked to a Template will automatically be fitted to all Shapes associated with that Template.
Any Animation linked to a Template will automatically be retargeted to all Shapes associated with that Template.
Setup Textures and Materials
You can refine the materials associated with any Template, Shape, or Deformable either before or after assigning its type. The material definition supports albedo, normal maps, and mask maps. Materials linked to a model are specified as its children, allowing you to select and assign the appropriate textures. For Normal and Mask maps make sure the textures are configured as Linear (not sRGB).
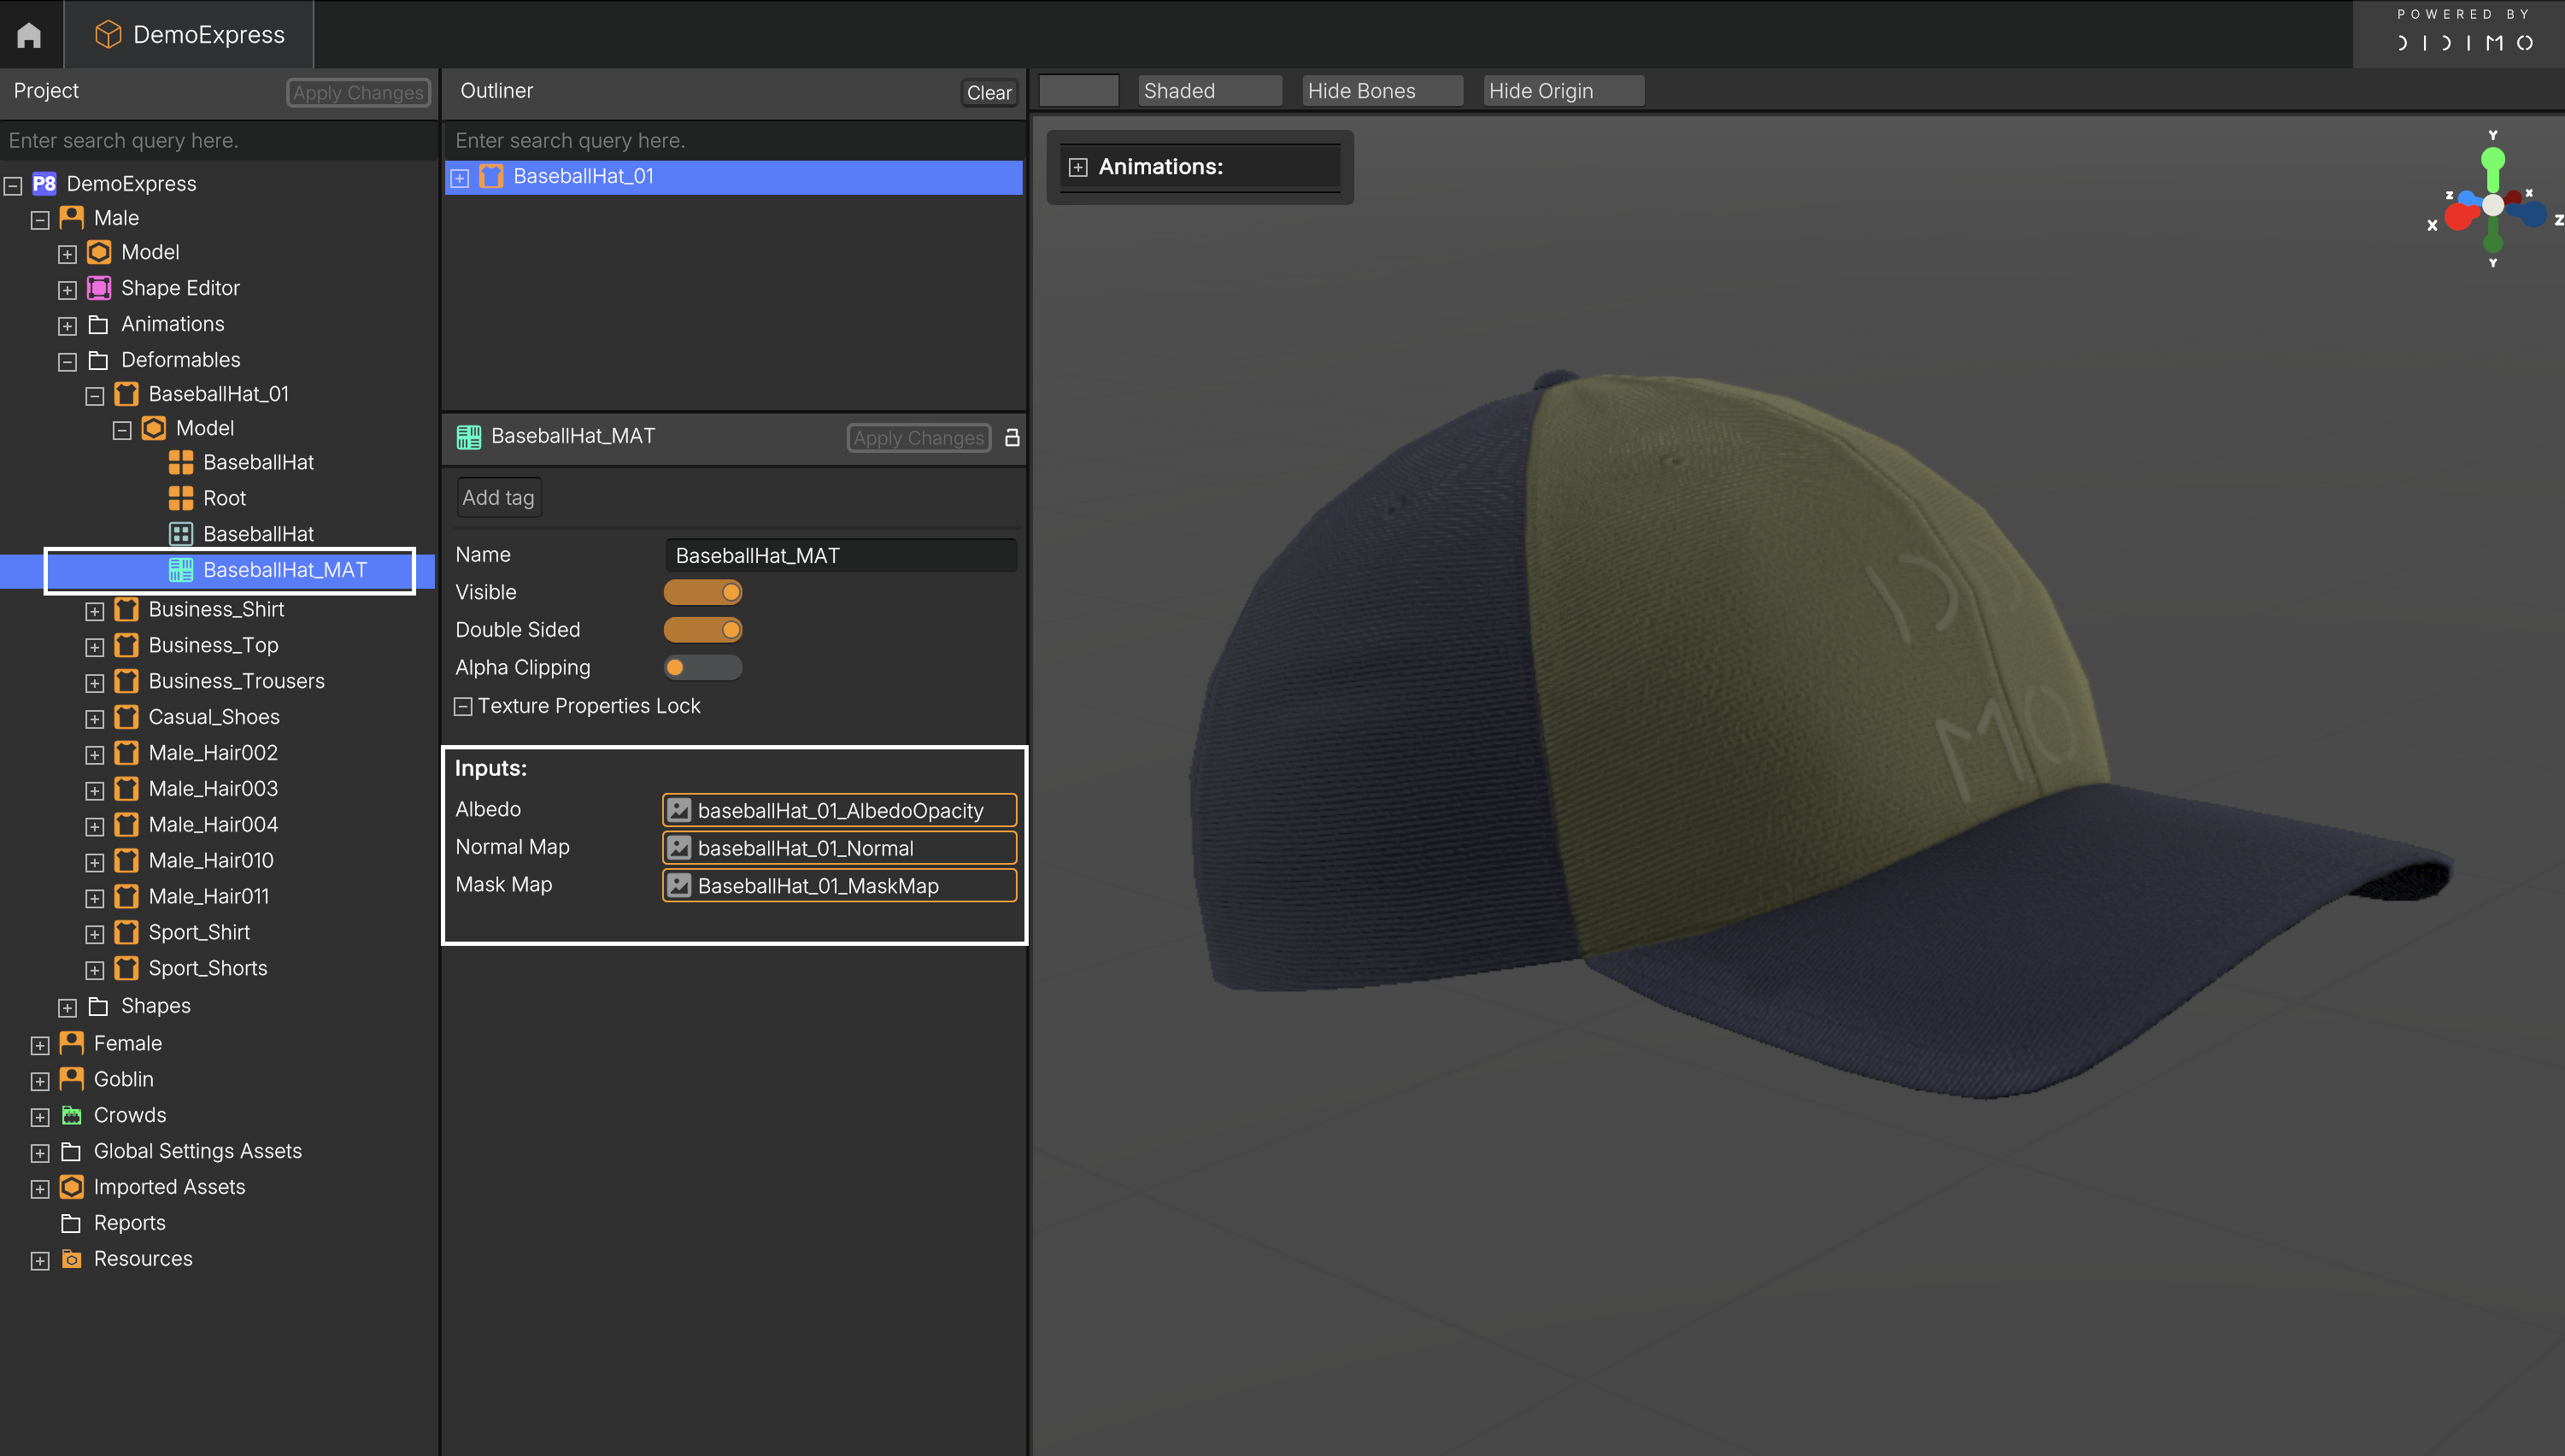
Example of a material assigned to a Deformable with linked texture maps in the DemoExpress project.
Key features
Shape Editor
The Shape Editor is a tool for creating head and body variations based on a Template. These variations can be generated using either:
- A default deformation rig, which can be retargeted to your own Template. Retargeting this rig to your template requires a manifold - an intermediary mesh that enables the Shape Editor to map supported head and body shape variations to your Template. Learn more about it here.
- A custom deformation rig.
The DemoExpress project uses the default rig.
How to use the Shape Editor
-
In DemoExpress, under the Male Template, select Shape Editor and click Launch.
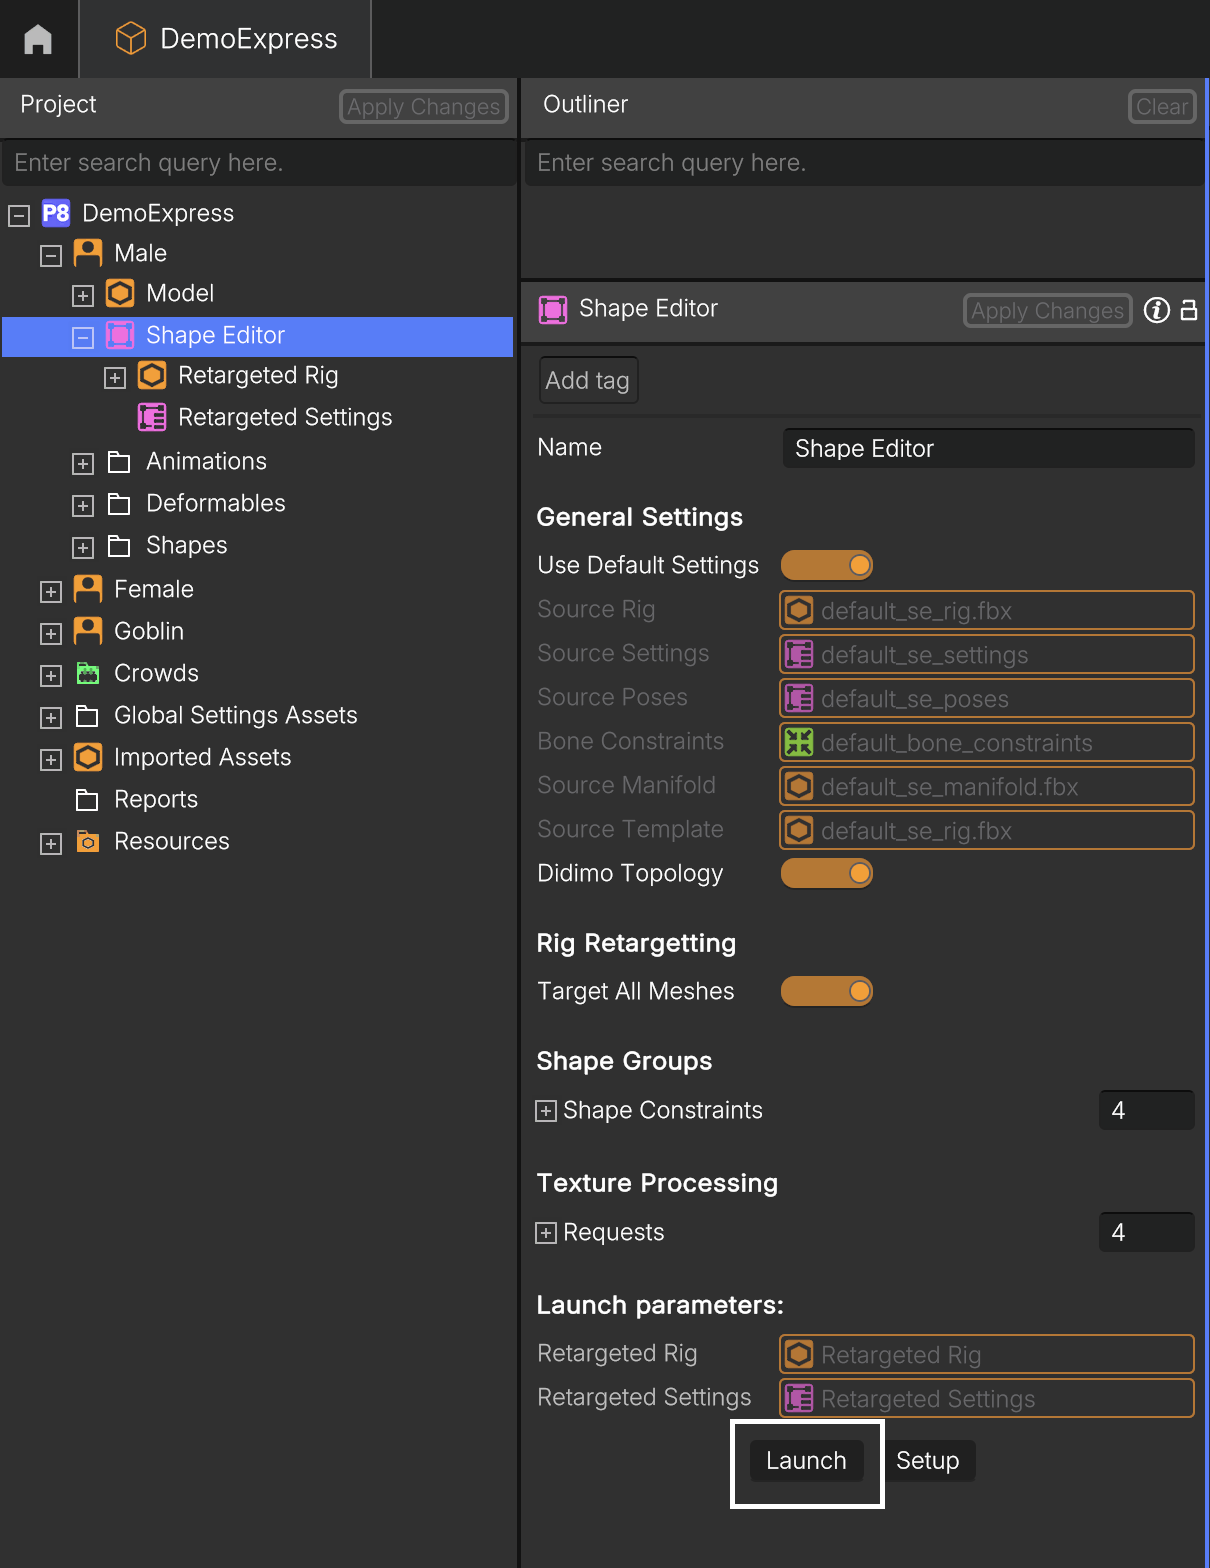
Launching the Shape Editor.
-
Once the editor opens, enter one of the many body regions to start modifying the head and body shape.
-
Adjust the sliders to achieve the desired look.
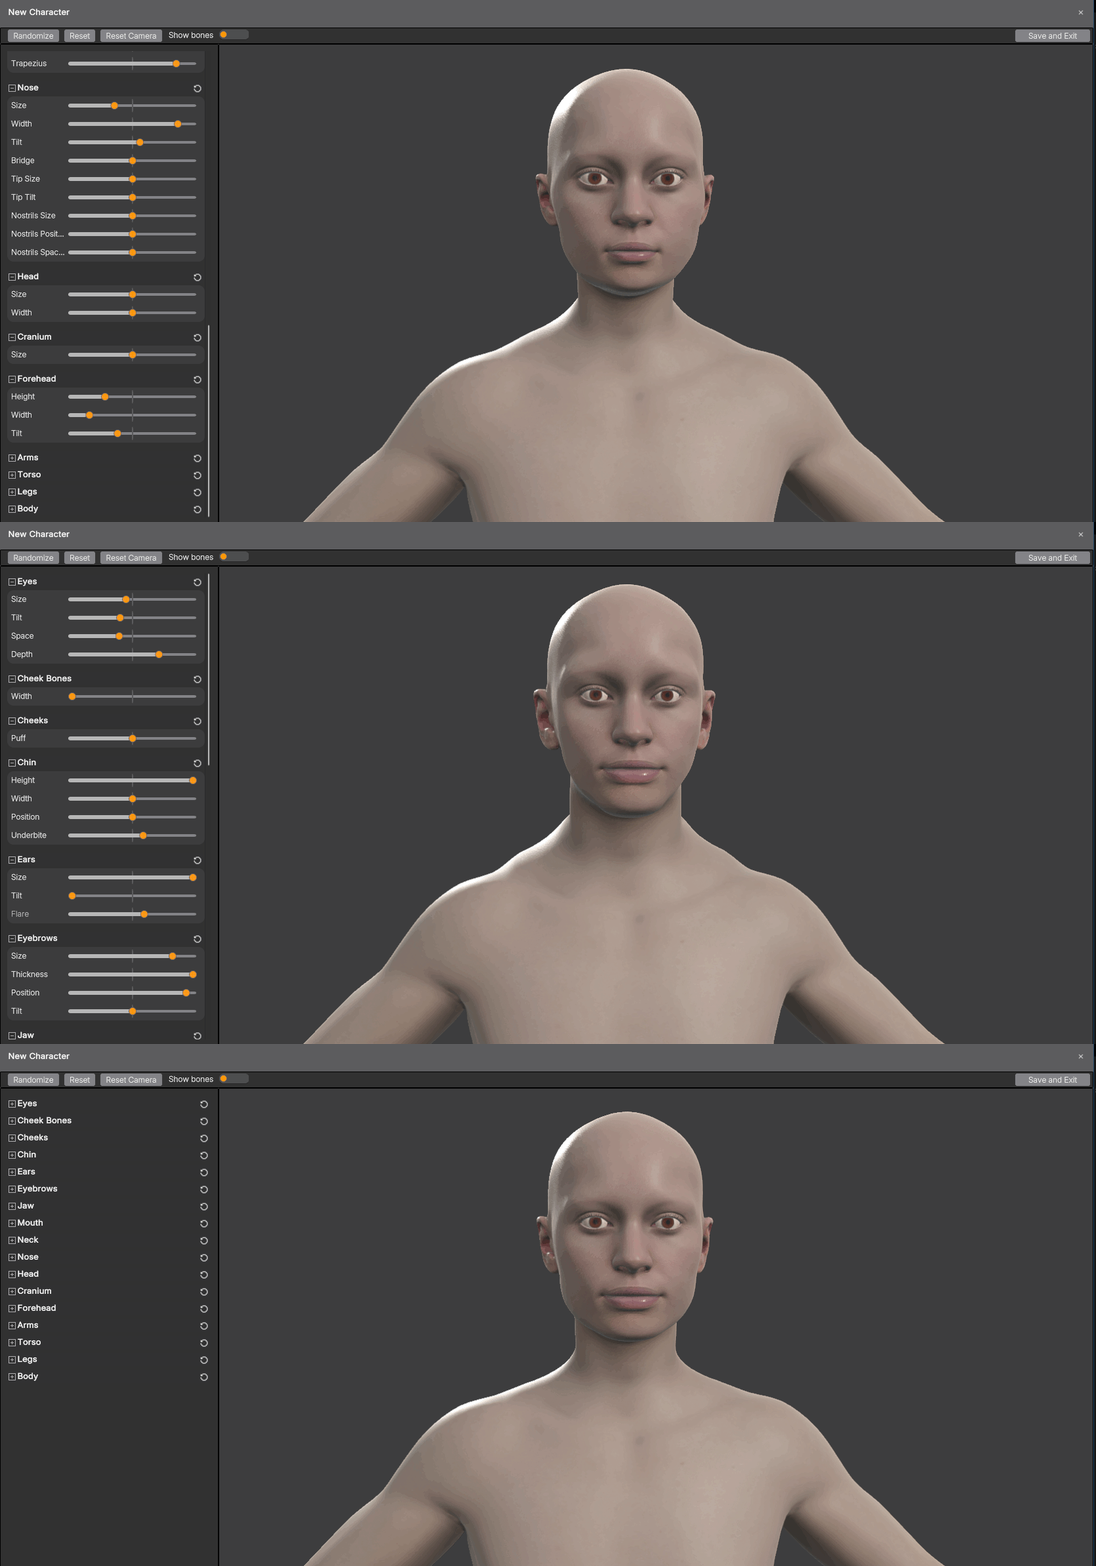
The Male Template and two shapes generated with the Shape Editor.
Alternately, to generate random variations, click the Randomize button in the top-left corner. Once you’re happy with your creation, click Save and Exit on the top right corner. This operation will take about 1 min, as all the Deformables will be fitted to the new Shape.
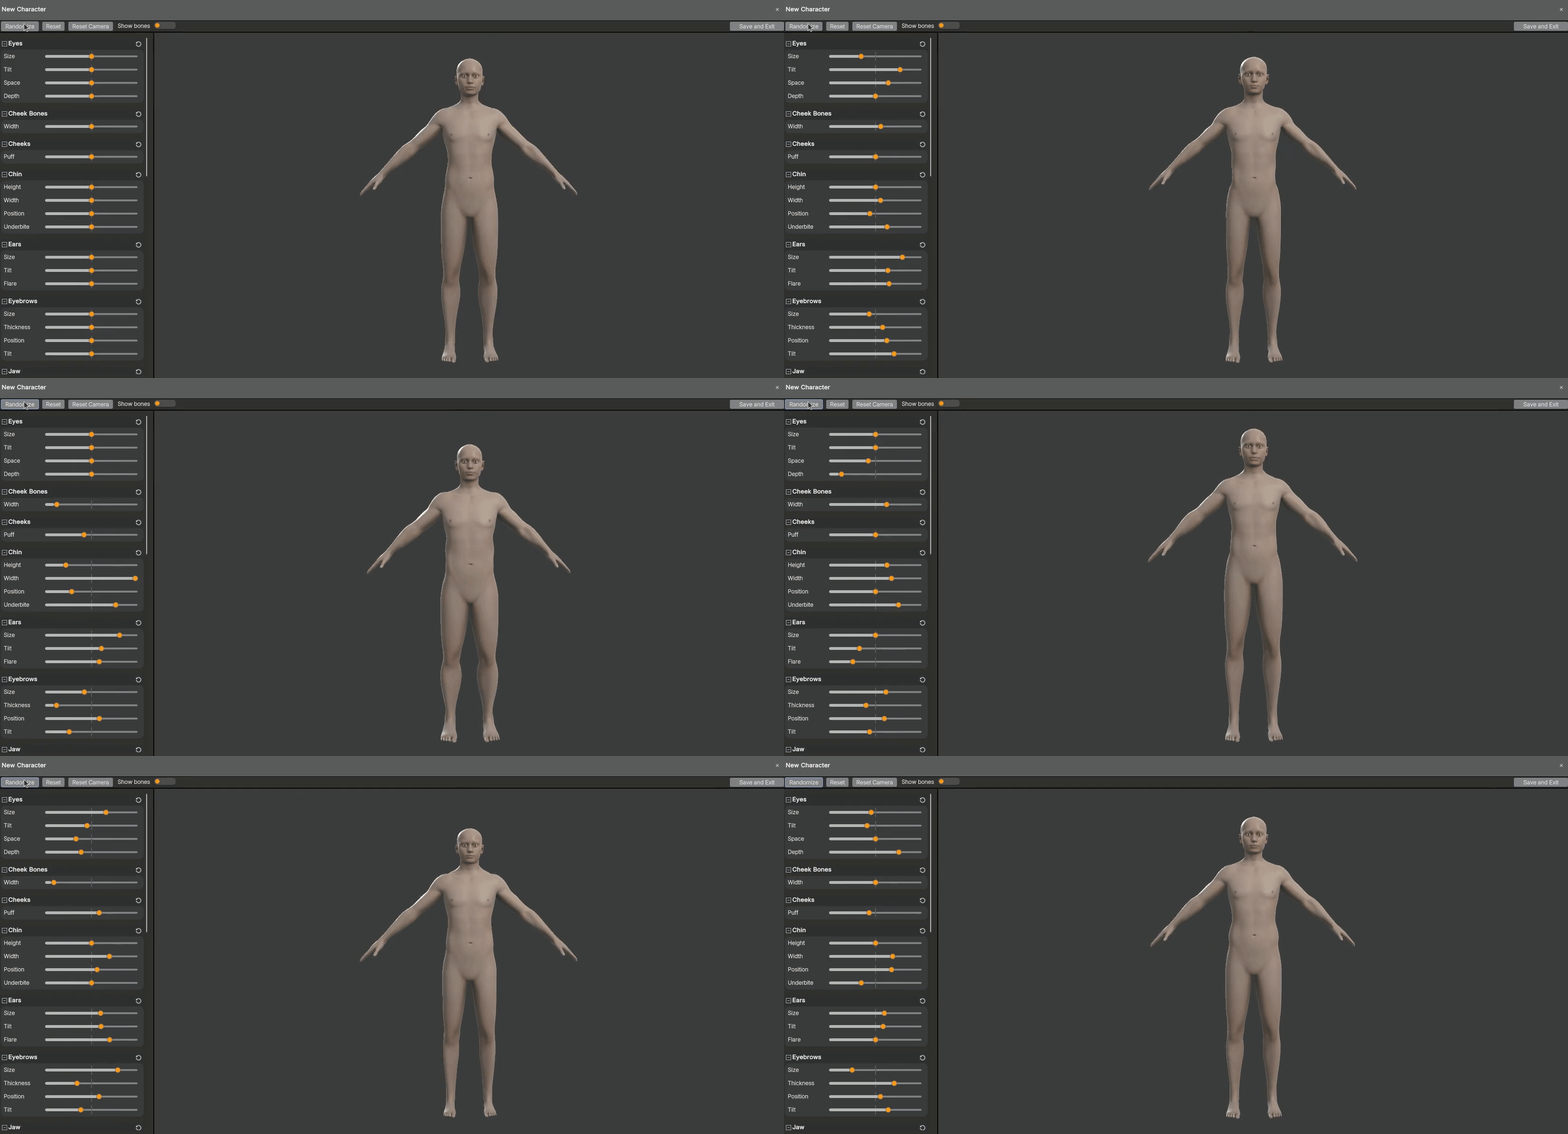
Using the Randomize feature of the Shape Editor.
Your new Shape will automatically appear under its corresponding Template, with all supported Deformables automatically fitted to it!
For advanced usage of the Shape Editor, check the official documentation.
Asset Fitting
The Default Asset Fitter
When linking Deformables to a Template, we automatically fit them to all Shapes associated with that Template using default settings. These settings are stored in an object called Default Asset Fitter, which is automatically initialized with every project. You can find under the Project tab, in the Resources > Asset Fitter folder, located at the bottom of the list.
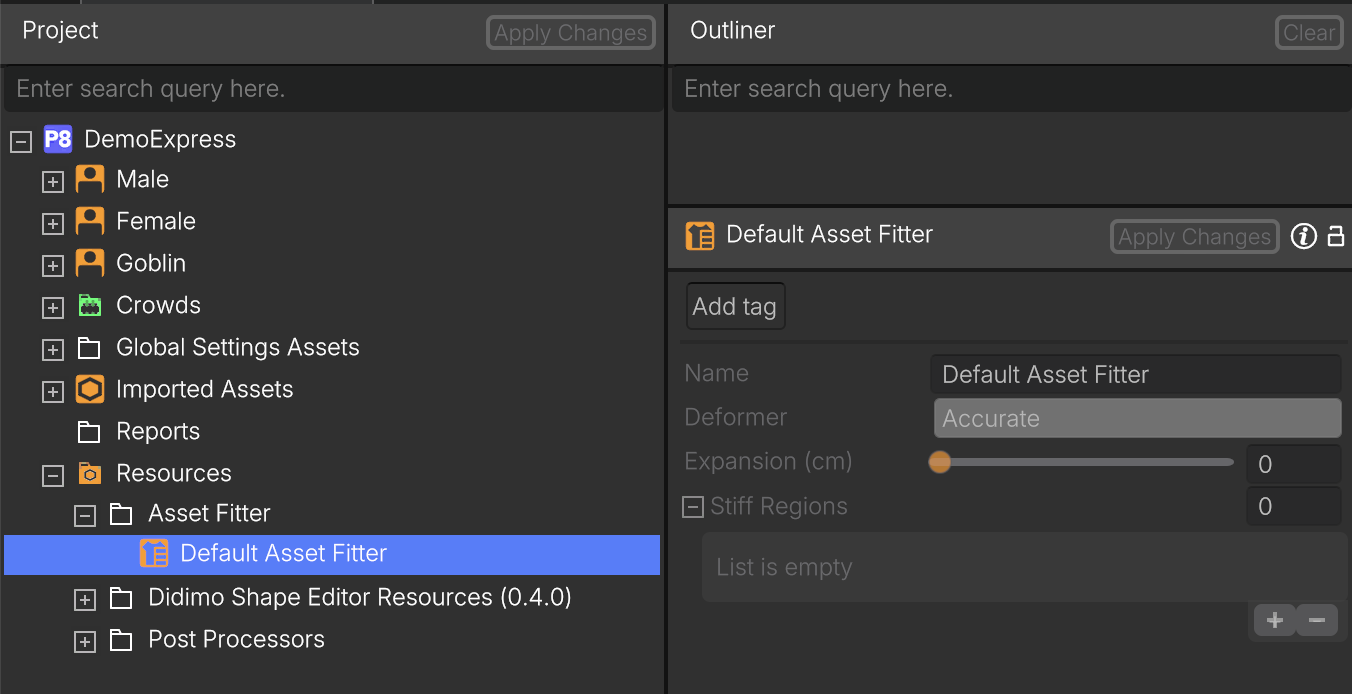
Default Asset Fitter location.
From Template to Shape
To view how the automatically fitted Deformables look, simply drag the intended Shape into the outliner, followed by the Deformable(s) you want to inspect. Below, we showcase how the Deformables Sports_Shorts, Sports_Shirt, Casual_Shoes, and BaseballHat_01 look on three different Shapes in the DemoExpress project: the Template (first image), the Heavy Shape (second image), and the Goblin Shape (third image).
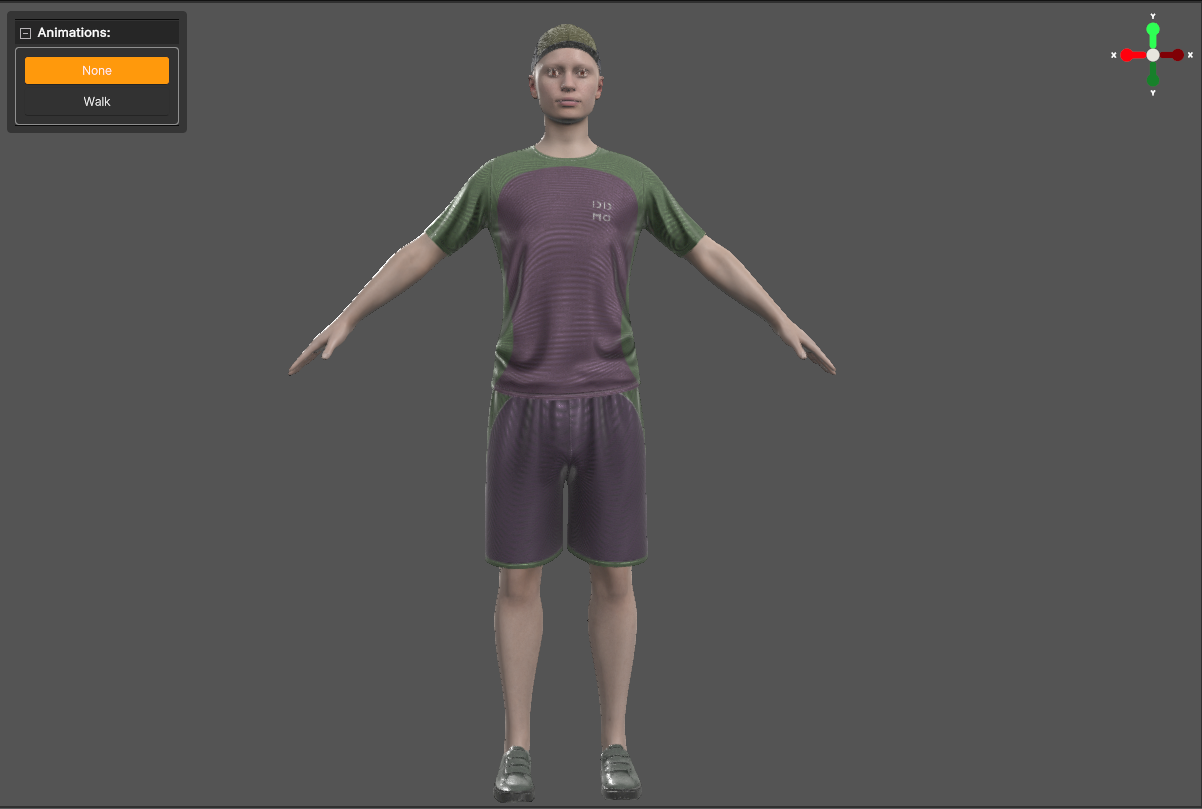
Original fit of the set of four Deformables on the Template.
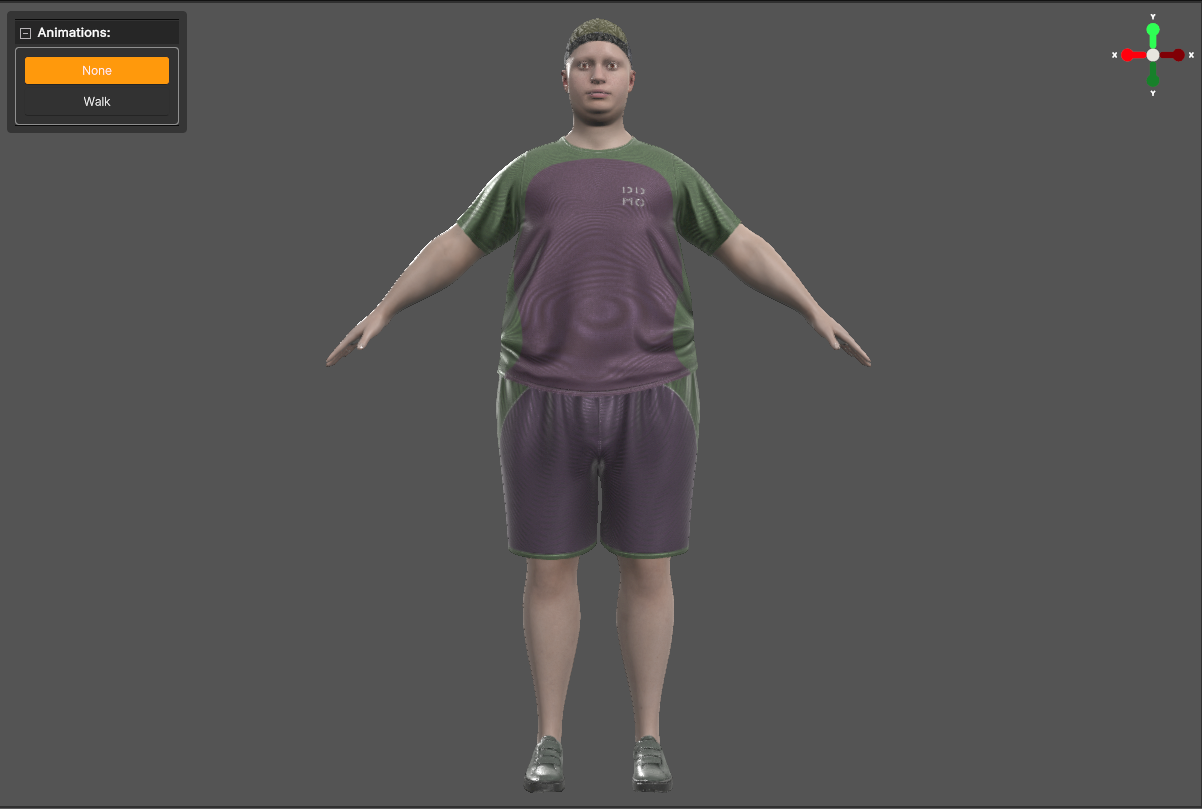
Fit of the set of four Deformables on the Heavy Shape.
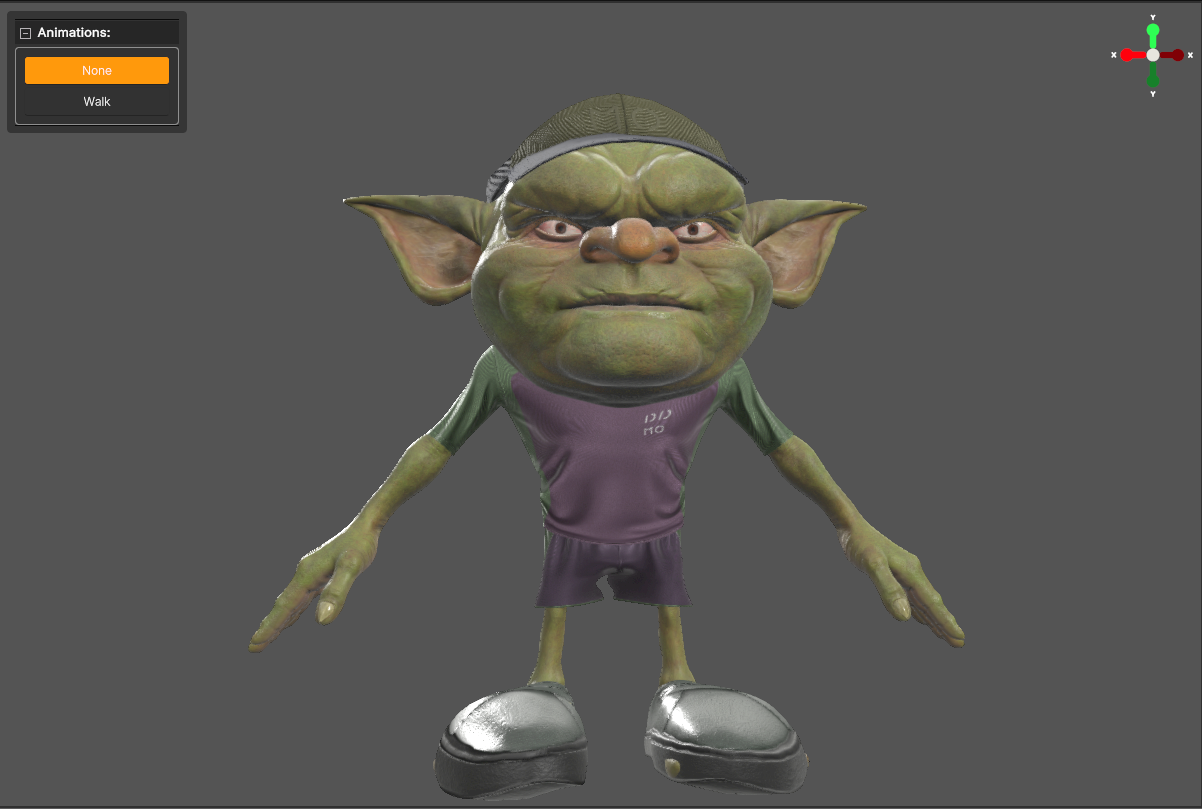
Fit of the set of four Deformables on the Goblin Shape.
How to use a custom Asset Fitter
When fitting a Deformable to a Shape with significantly different body proportions from the Template, the default fitting method (Fast method) may not yield the best results. In such cases, you can create a custom Asset Fitter, link it to the Deformable, and adjust the settings for better results. Here’s how:
-
Create a custom Asset Fitter – Right-click on the Deformable and select Create → Asset Fitter. This will add a new Asset Fitter object under the Deformable.
-
Link the Asset Fitter – Select the Deformable, then drag the new Asset Fitter object into the Asset Fitter slot. This ensures the fitting process uses your custom object instead of the default one.
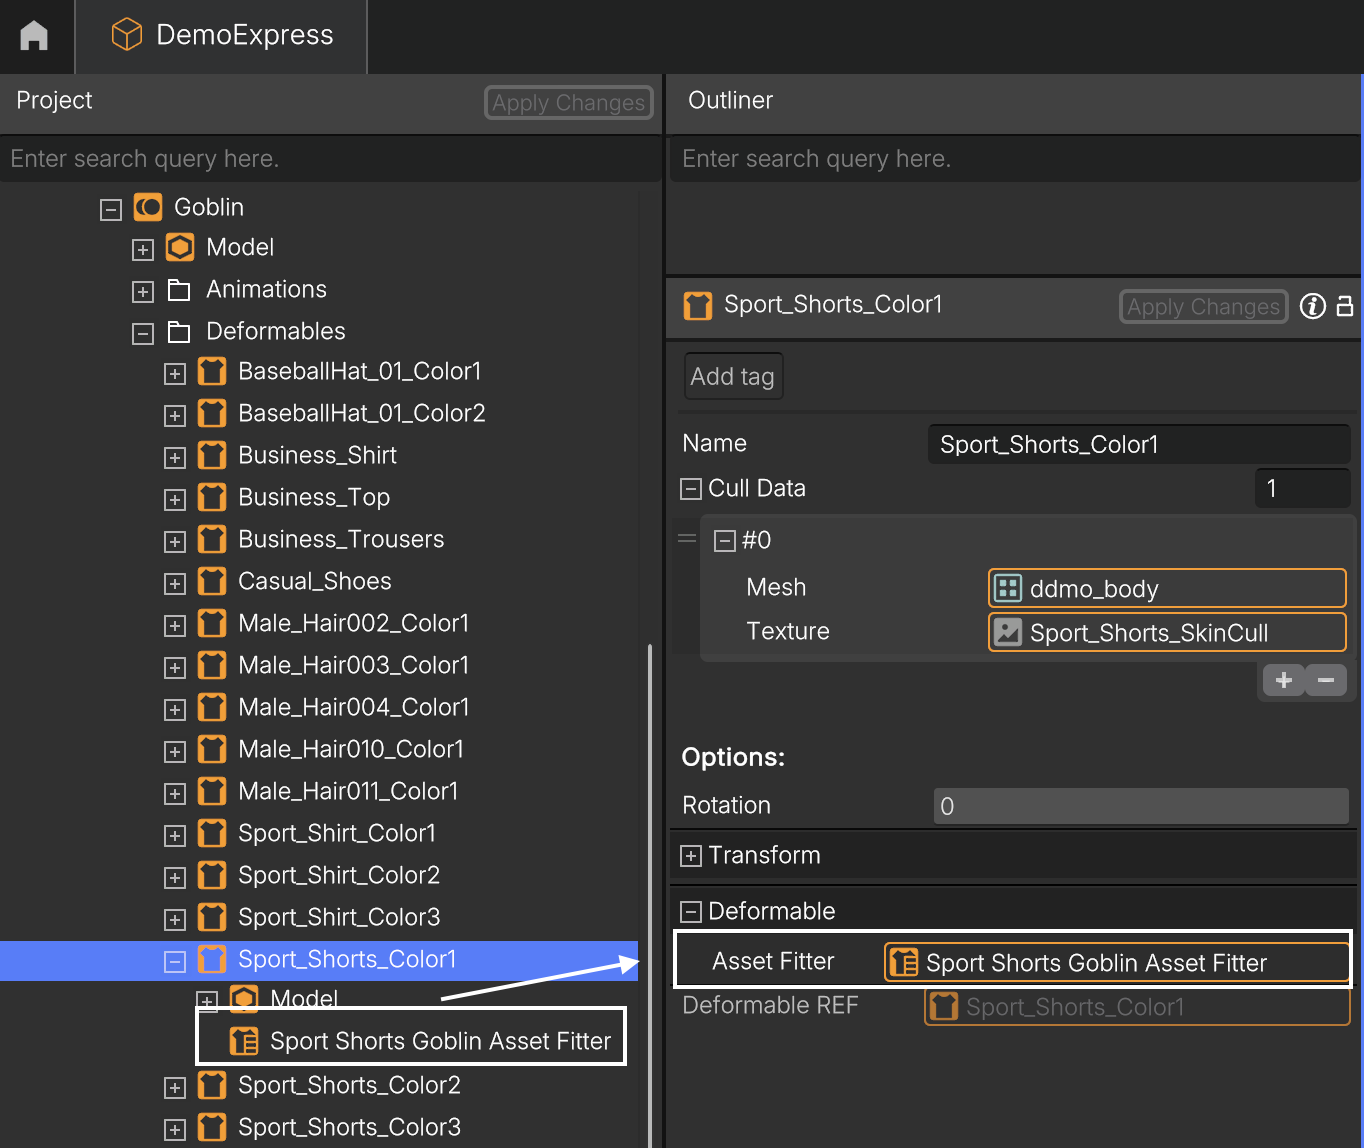
Custom Asset Fitter linked to Deformable.
-
Customize the settings – Open the new Asset Fitter object and adjust the parameters. Switching the Deformer from Fast to Accurate can significantly improve the fitting.
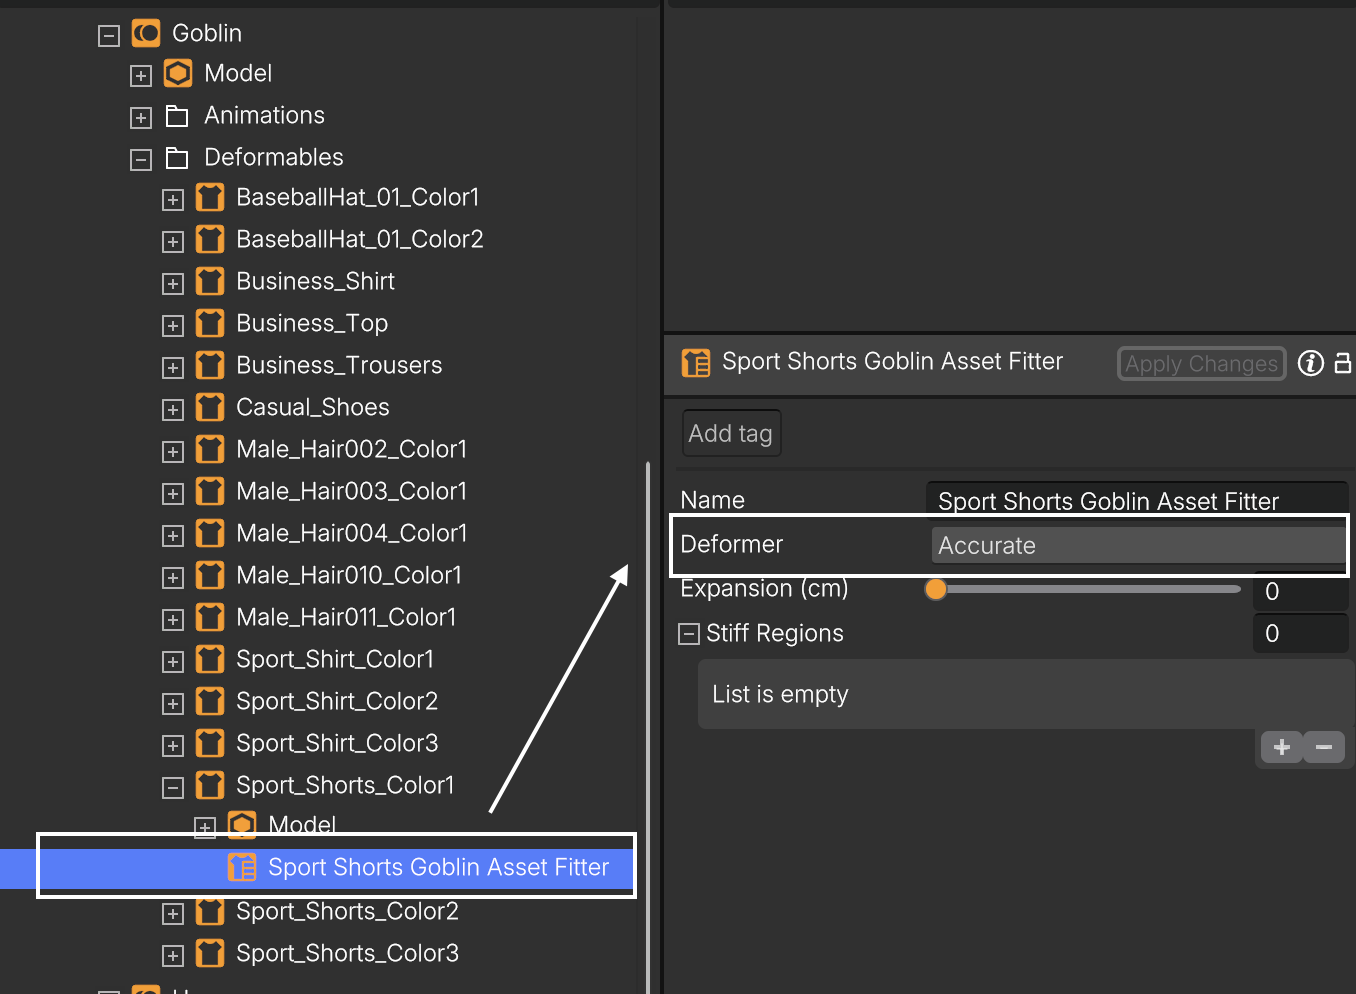
Asset Fitter settings.
In the DemoExpress project you can find a custom Asset Fitter in the Goblin Shape, on the Deformable Sports_Shorts. Switching to the Accurate Deformer instead of the Fast one greatly enhances the fit!
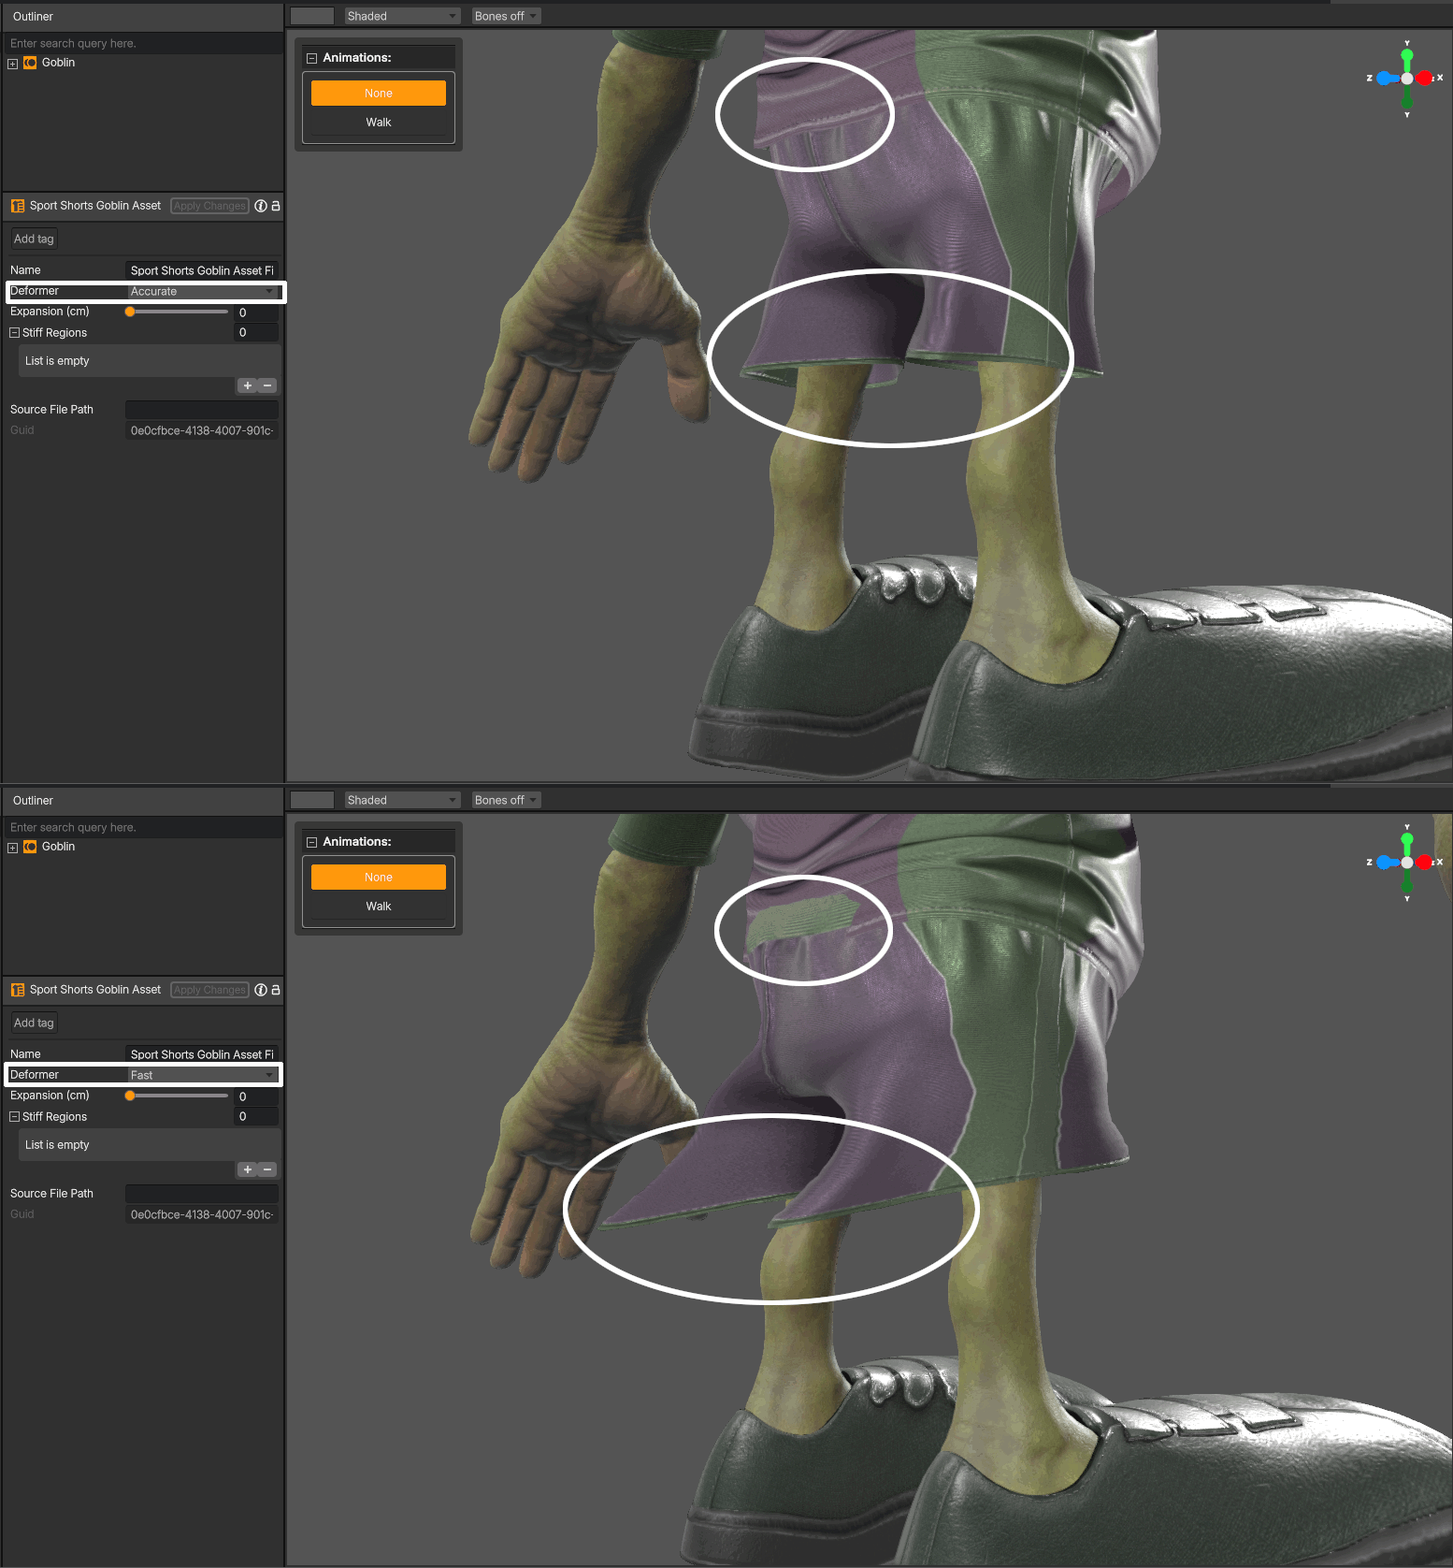
Effect of changing the Deformer from Fast to Accurate.
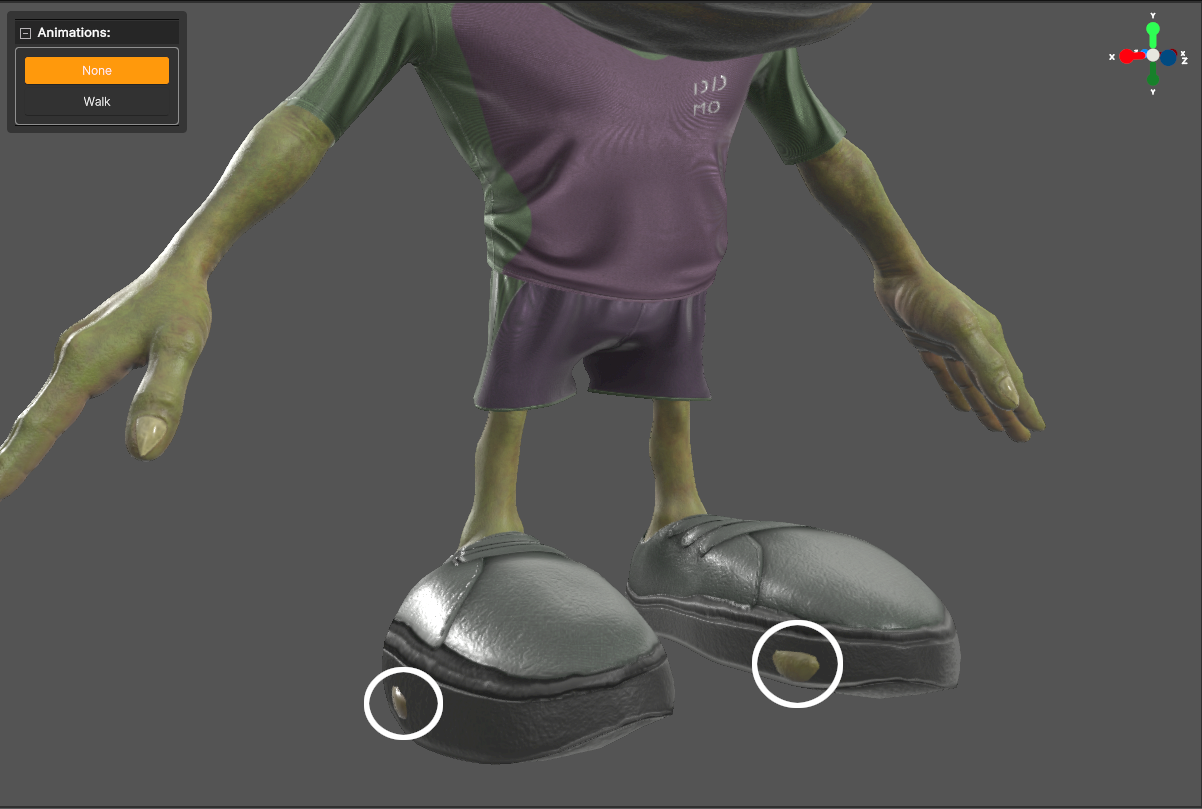
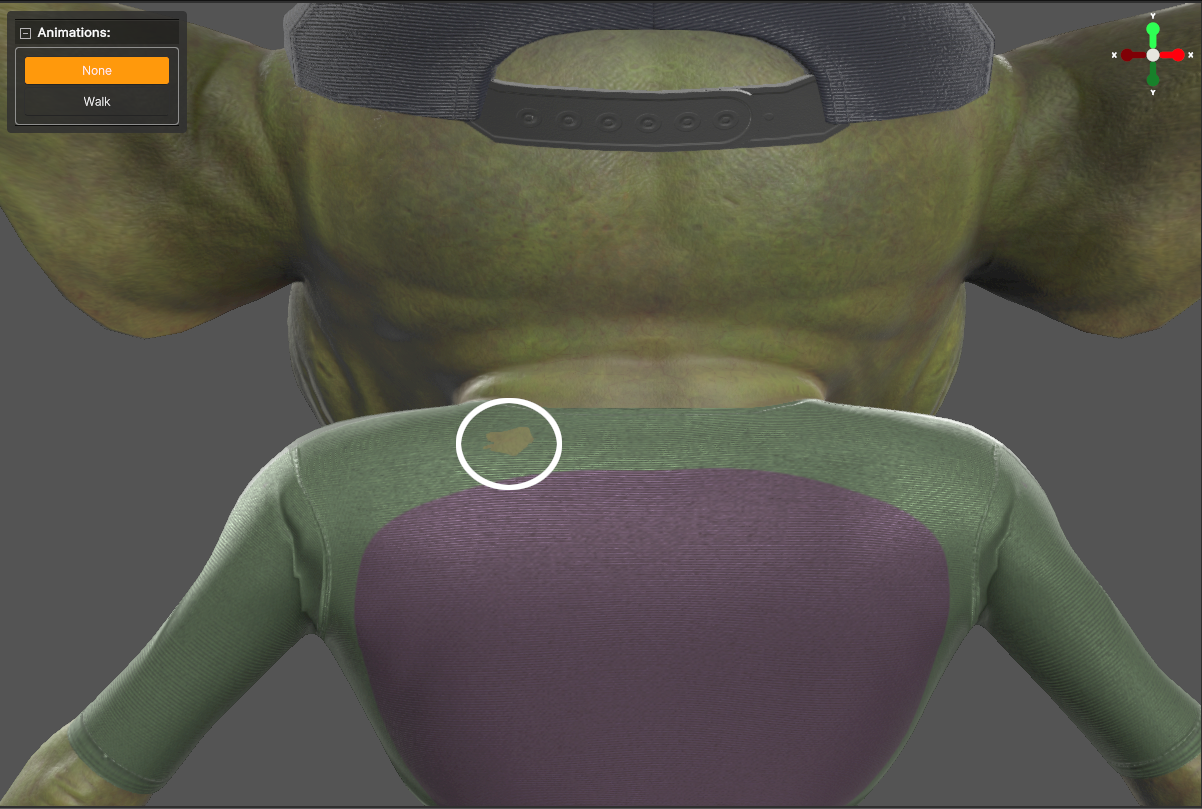
Even though the Accurate fitting method generally performs well - even when adapting Deformables to Shapes that differ significantly from the Template - minor intersections with the body may still occur. You can mitigate these by adjusting the Expansion slider on the Asset Fitter, which loosens the fit of the Deformable. Alternatively, you can manually fix each intersection - we’ll show you how in the Handling Intersections section.
| Intersections on Shoes | Intersections on Shirt |
|---|---|
 |  |
Fitting with rigidity
When fitting a Deformable to a Shape, certain regions—such as metallic pieces, armatures, buttons, buckles, or certain patterns—should remain stiff. However, they may deform unexpectedly during the fitting process. To preserve their structure, you can apply stiff regions using a custom Asset Fitter. Here’s how:
-
Import stiff region masks – Use binary masks painted in the Deformable's UV space, where stiff regions are represented in white and flexible regions in black.
-
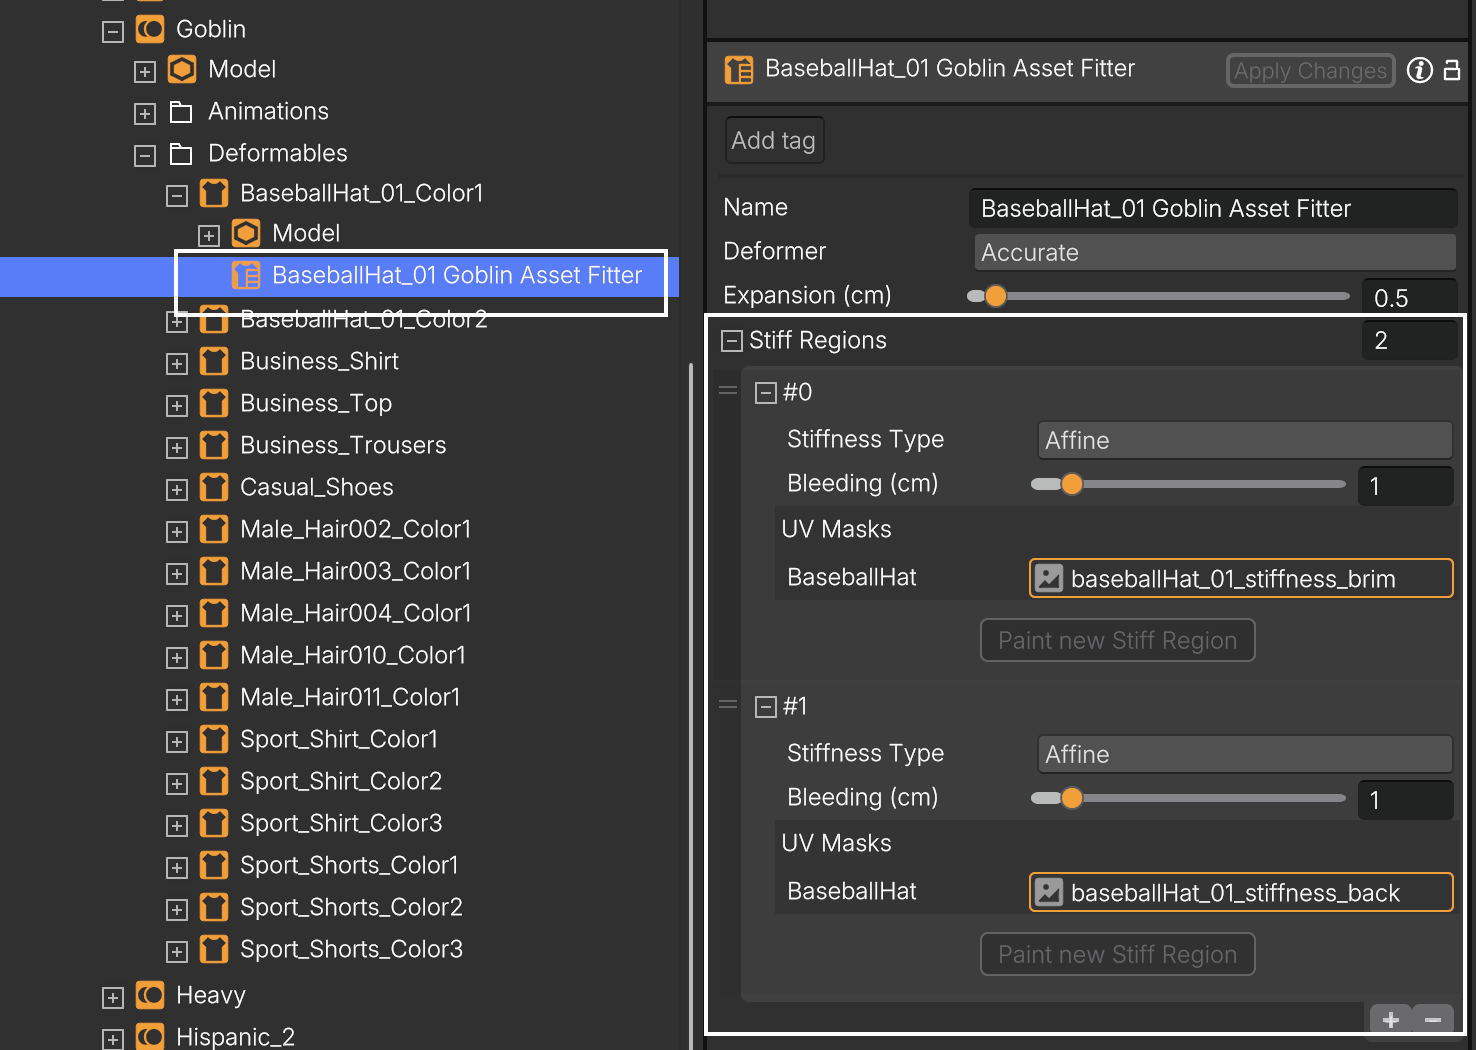
Define stiff regions – In the Asset Fitter, click the "+" button to add a new stiff region, then drag the region mask to the UV Masks slot. Adjust parameters like Stiffness Type and Bleeding as needed.
-
Apply changes – Click Apply Changes to update the Deformable’s fitting and preserve the intended structure.
You can see an example in DemoExpress, where a custom Asset Fitter with stiffness regions is applied to the Goblin Shape on the BaseballHat_01 Deformable.
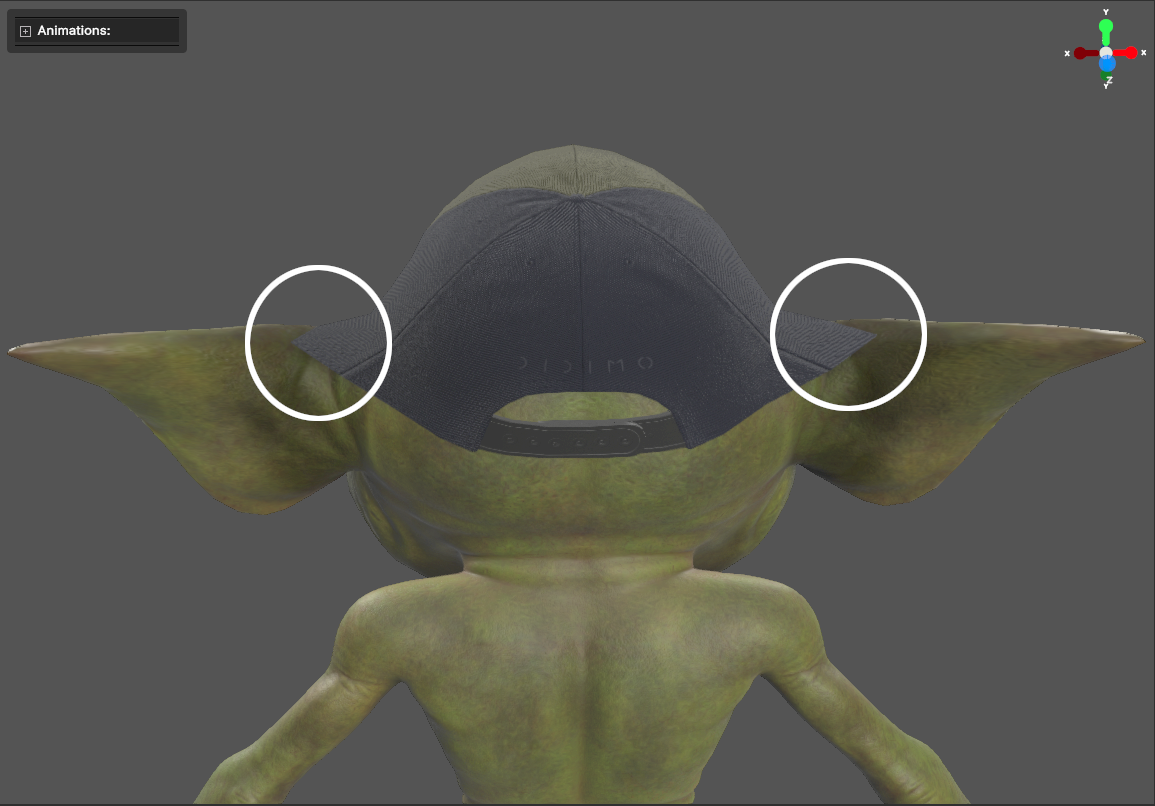
Incorrect fitting artifacts when fitting the BaseballHat_01 Deformable to a Shape with elongated and pointy ears.
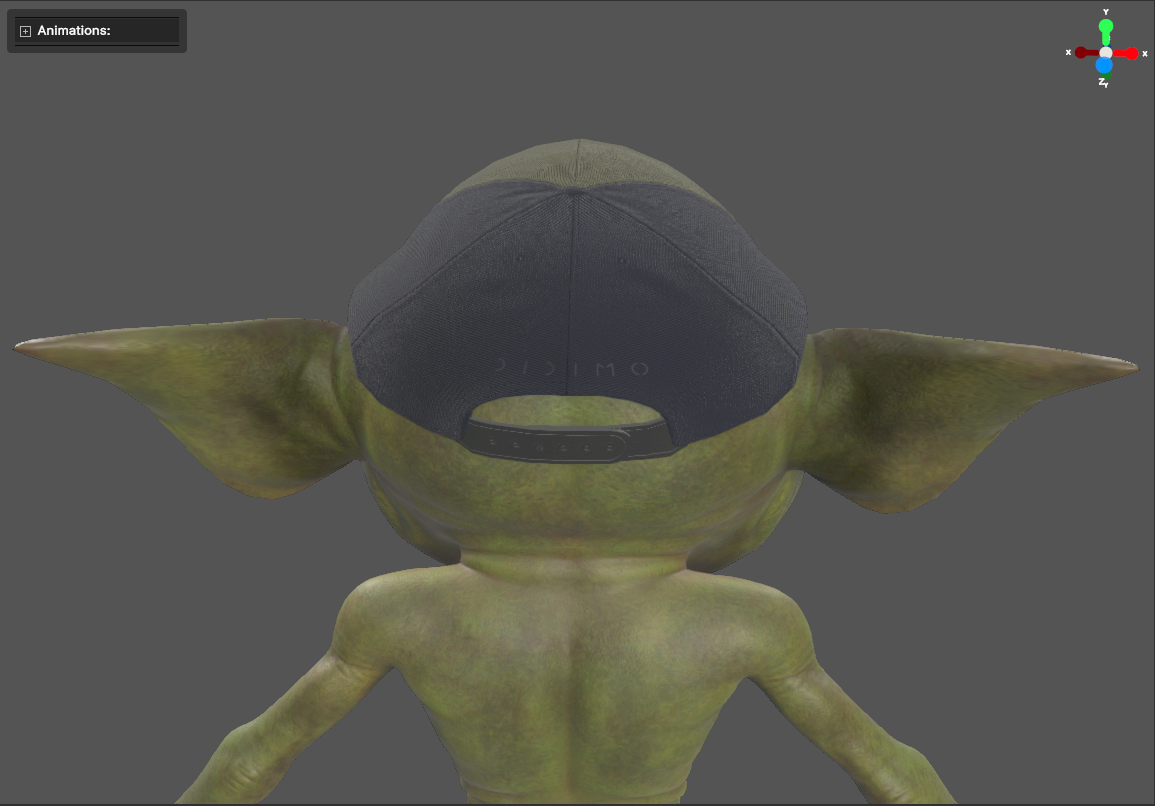
Correct fitting of BaseballHat_01 by setting stiffness regions on the back and brim of the Deformable.
For more information about the usage of the Asset Fitter, check the official documentation.
Handling Intersections
Intersection Solver
The Intersection Solver is a tool that can be linked to any Deformable to detect and solve intersections with the Template or Shape it is fitted to - meaning, you can fix an intersection in the Heavy shape only.
How to use the Intersection Solver
- Create the Intersection Solver – Right-click on the Deformable and select Create → Intersection Solver.
- Detect intersections – Click Verify to detect any intersections between the Deformable and Template/ Shape.
- Fix intersections – Browse the list of detected intersections and fix them individually, or apply all suggested fixes at once by clicking Fix All.
- Finalize the adjustments – Either run Verify again to check for remaining intersections or save the updated Deformable by clicking Apply Changes.
You can see an example in DemoExpress, where an Intersection Solver is applied to the Goblin Shape on the Sport_Shirt_Color2 Deformable. The solver is already in place, but if you want to experience the process yourself, simply press Reset to undo the applied fixes. Then, follow steps 2 through 4 to detect and resolve intersections on your own!
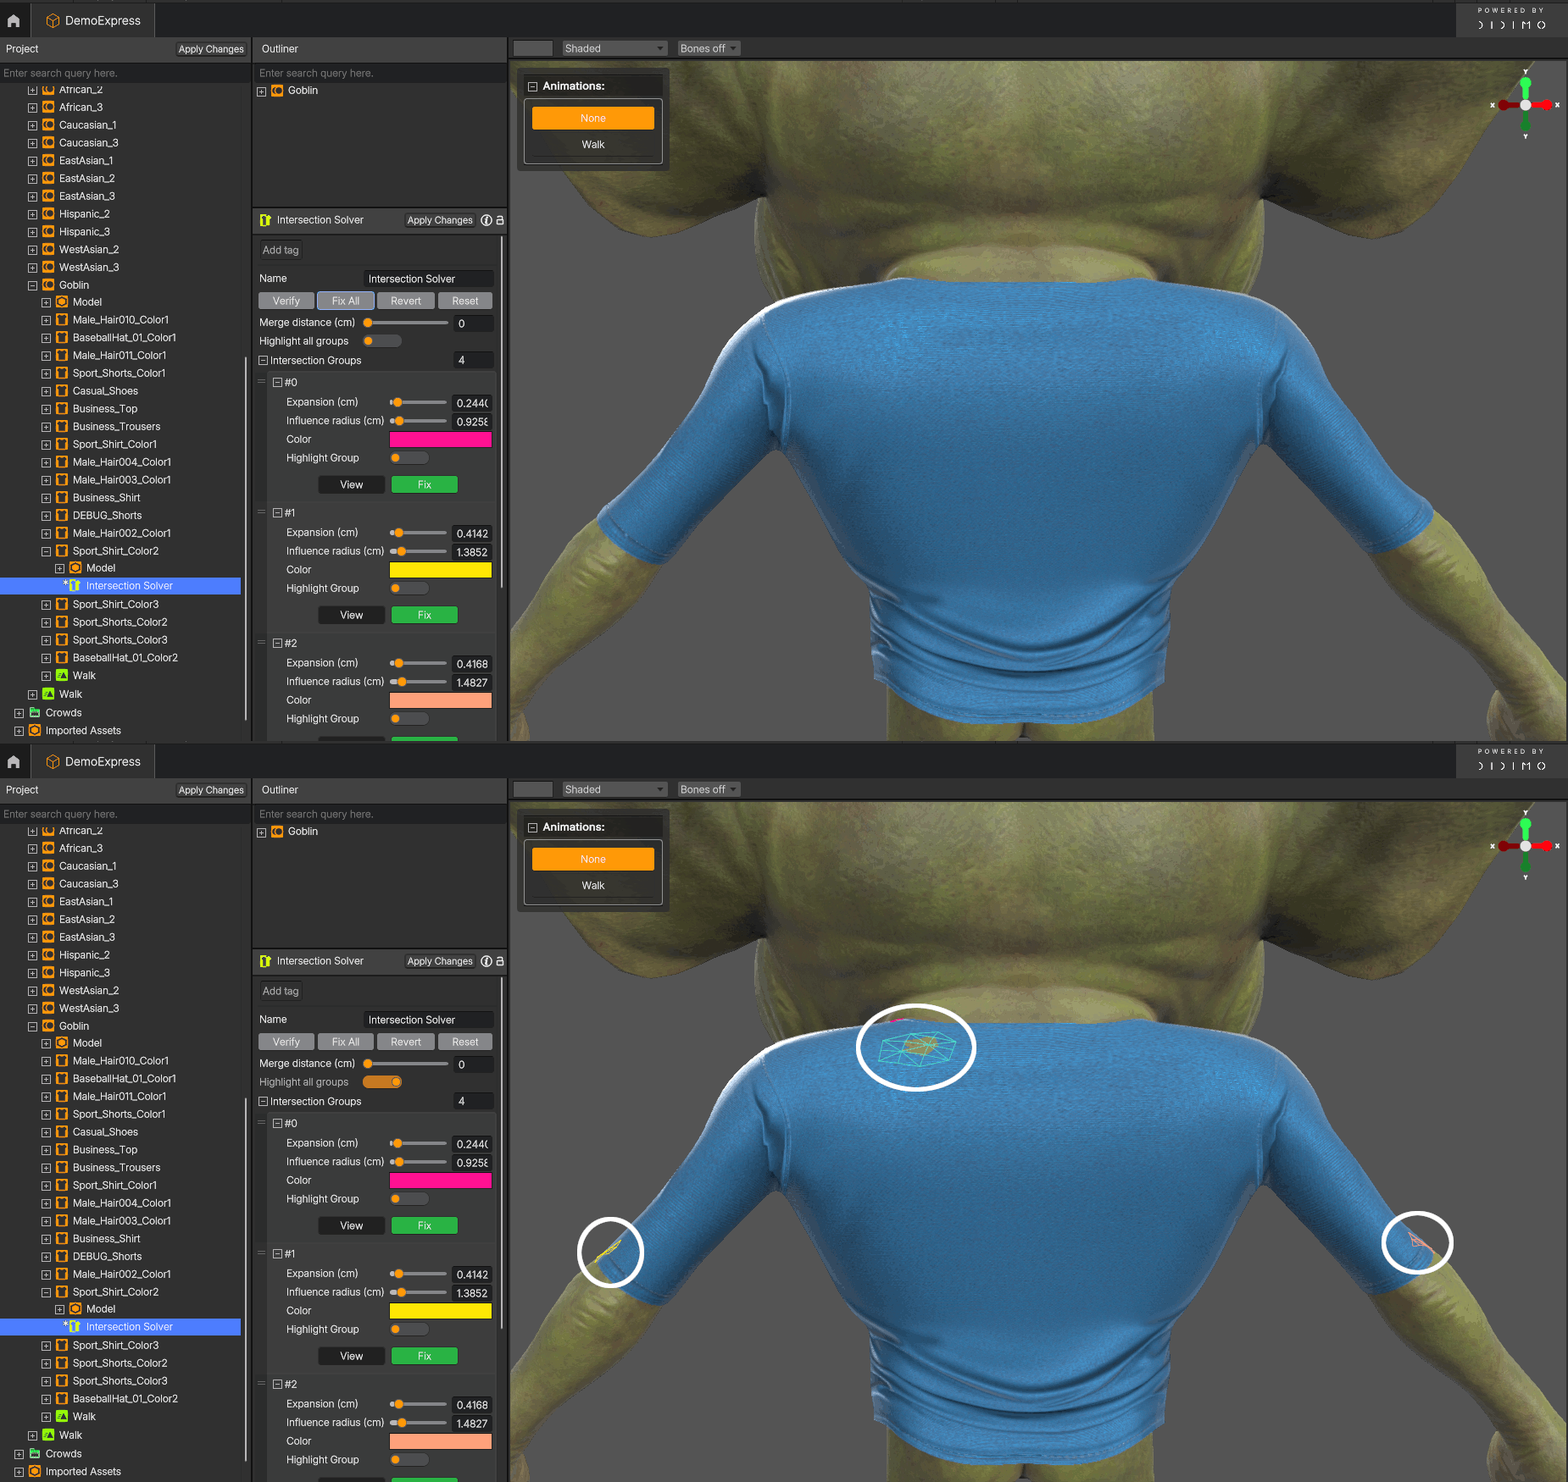
Fixing all intersections using default settings.
Fixing intersections between a Template and a Deformable will automatically trigger fitting updates on the Shapes. As a result, the Deformable’s fitting will improve across all Shapes thanks to the intersection fixes on the Template!
For more information about the Intersection Solver, check the official documentation.
Create Crowds
A Crowd is a collection of characters that follow the Template’s technical requirements but feature variations in head and body shape, along with randomized Deformables assigned to each Crowd Character. You can create rules to control how these elements influence your Crowd's appearance.
How to create a Crowd
-
Create a Crowd Object Right-click anywhere and select Create → Crowd. This will generate a new Crowd object under the Crowds section in the Project tab. You can now rename your Crowd.
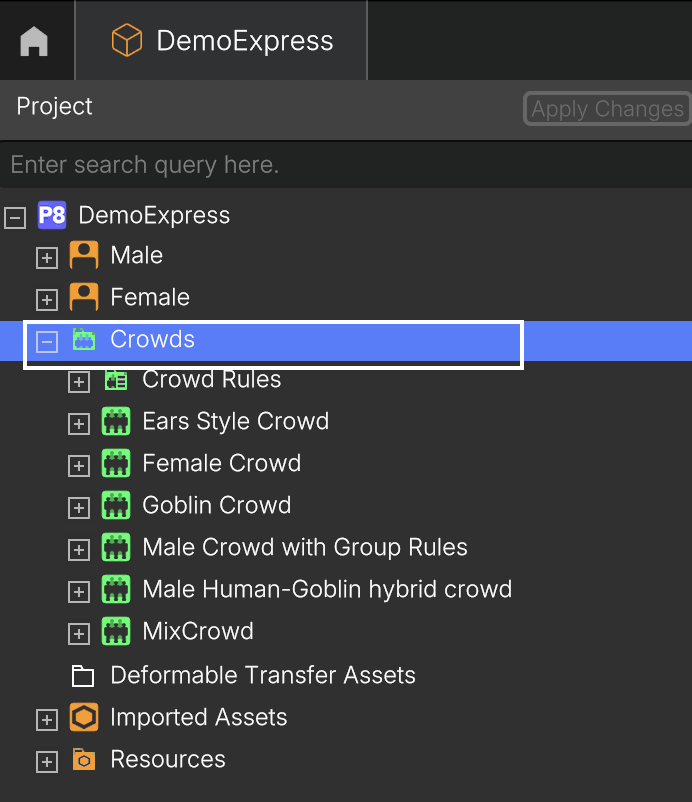
Locating the Crowds section on the Project tab.
-
Instantiate Characters on your Crowd
-
A Crowd can include Characters from multiple Templates. To define how many Characters each Template should contribute:
- Add a new entry under Characters Per Template.
- Enter the desired number of characters in the Character Count slot.
- Drag the corresponding Template into the Asset Object slot.
-
Click Apply Character Count to generate the Characters.
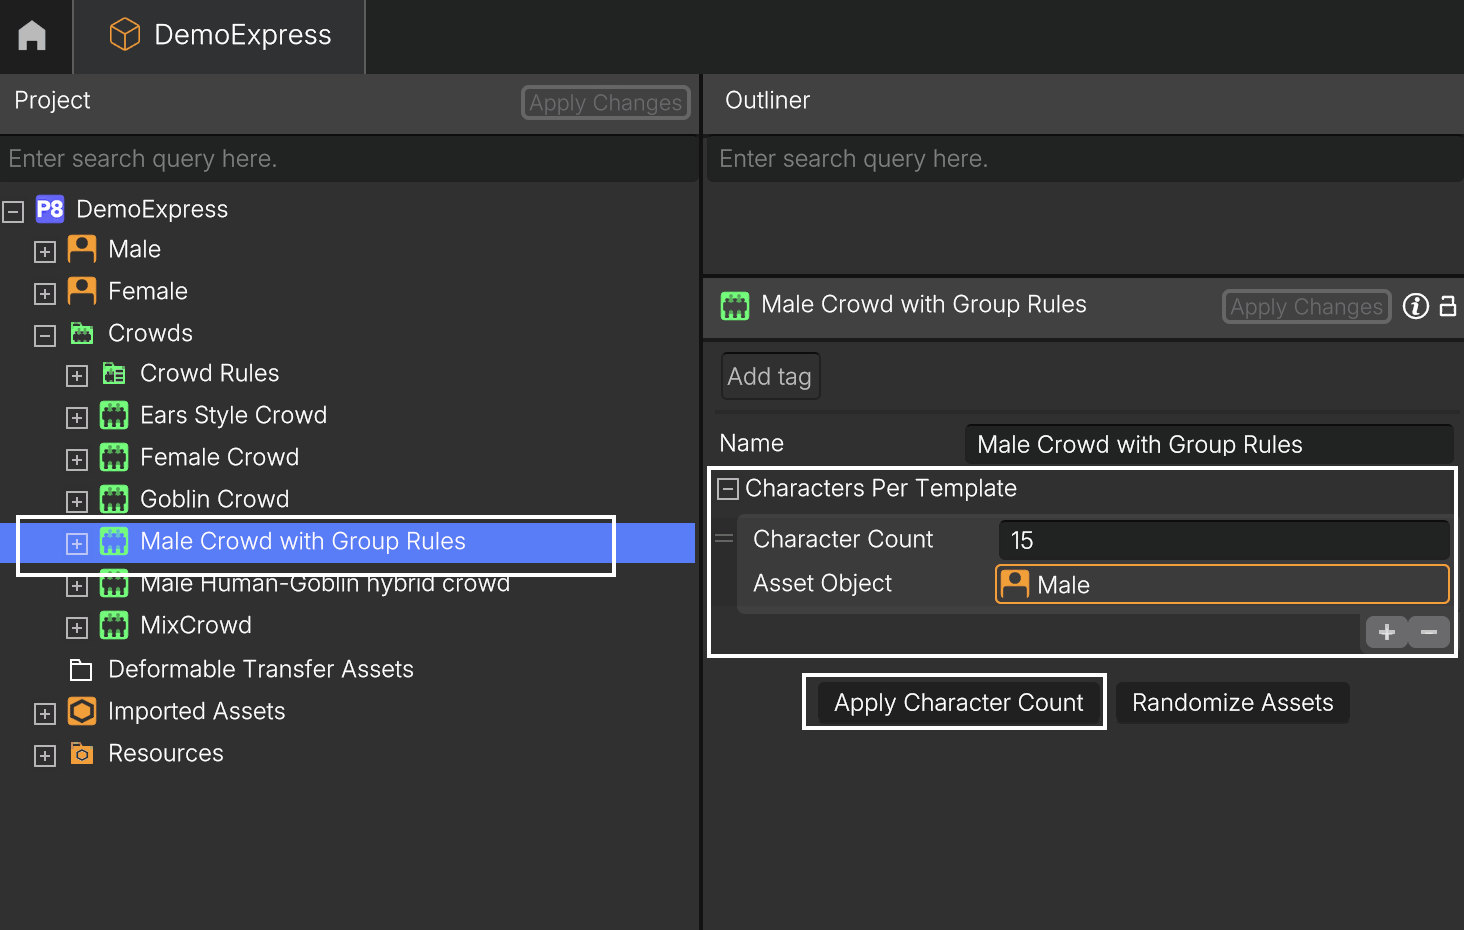
Instantiating Characters in a Crowd.
-
Your Crowd will now contain the correct number of Characters, all matching their respective Templates. From here, you can define rules to introduce variations and make your Crowd come to life!
Shape blending types
Before moving on to Crowd Rules to customize your crowd generation, it’s important to understand how Popul8 creates characters. Crowd characters are generated by blending existing shapes, and the blending method depends on the type of Shape you are working with. This type is determined by the Blend As Absolute toggle, which is off by default (meaning the shape is treated as a delta shape) but can be switched on to represent an absolute shape.
When a shape represents a relative change from the template shape, whether it’s localized (e.g., nose size, ear length, eye angle) or more global (e.g., overall height, body weight), it should be treated as a delta shape. Delta shapes adjust specific traits in relation to the template, rather than replacing it entirely.
Examples of delta shapes:
Local variations: larger nose, longer ears, eyes tiled upward, wider jaw, ...
Global variations: taller/shorter, thinner/fatter, more muscular/less muscular, ...
Important: If you have multiple delta shapes affecting the same feature (e.g. different versions of height or corpulence), they should not be used together, as this can cause distortion. To avoid this, group them into the same crowd rule with a Shape Blend Number of 1 (default), so only one is randomly selected and applied at a time.
In contrast, absolute shapes encode several combined differences from the template, such as fully unique heads that modify proportions, age features, or ethnicity. These are designed to replace the template rather than layer changes on top of it. Absolute shapes are blended simultaneously to create rich variation. Just make sure the Blend As Absolute flag is turned on, and set a Shape Blend Number of 3 or more in the rule for best results.
Key blending guidelines:
Treating absolute shapes as deltas will considerably limit the range of plausible variations, since only one shape will be selected and blended at a time. This prevents the system from combining multiple distinct features, which is precisely the strength of absolute blending.
Conversely, treating delta shapes as absolute can lead to unintended results, such as the template features appearing repeatedly across all blended characters, or combinations of conflicting deltas creating unrealistic shapes.
Introducing Crowd Rules - rules for facial variation
You may want to introduce facial variations in your Crowd to enhance diversity. You can achieve this by blending between the Shapes associated with the Template of each Crowd Character.
Popul8’s blending method seamlessly combines the geometry and textures of your selected Shapes with varying weights, generating unique and natural-looking facial variations across your Crowd. You can use Shapes that you previously designed in the Shape Editor or Shapes designed in an external software and imported into Popul8.
In the DemoExpress project, you'll find externally designed Shapes assigned to the Male Template ( from African_1 to West_Asian3). These Shapes feature distinct head shapes and different albedos for the head, body, and eyes. When using a Shape to generate facial variations in a Crowd, which is a special case, you must enable the Blend Textures and Blend As Absolute toggles for each Shape.
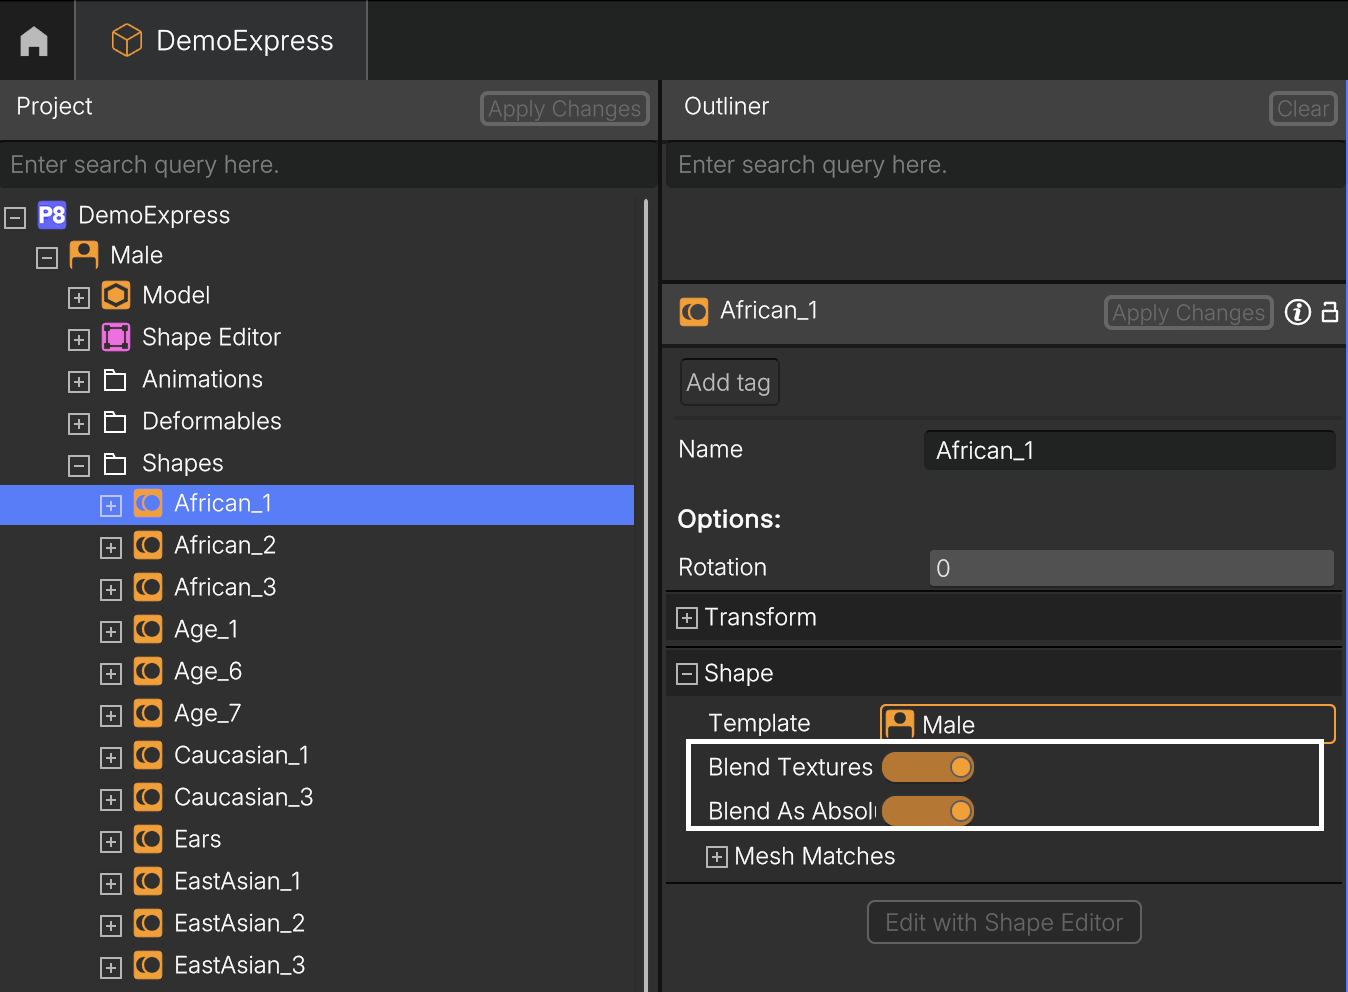
Blend Textures and Blend As Absolute toggles.
In the Crowd Rules section, you'll find a rule called Rule MixFaces, which defines how Shapes are blended within the Crowd to create facial variations. Here's how to create that rule:
-
Create a New Crowd Rule
- Right-click anywhere and select Create → Crowd Rule. This will instantiate a new Crowd Rule, which you can rename.
-
Set Up the Rule for Facial Variations
-
In the Crowd Rule settings, specify that you're creating facial variations by setting Shape Blend Number to a value between 1 and the total number of Shapes included in the rule. This determines how many Shapes each character will blend together using varying weights. A higher number increases variation potential but may also result in more exaggerated or unconventional shapes.

Shape Blend Type and Number.
-
-
Assign Shapes to the Rule
-
Drag the previously labeled facial variation Shapes into the Properties section.
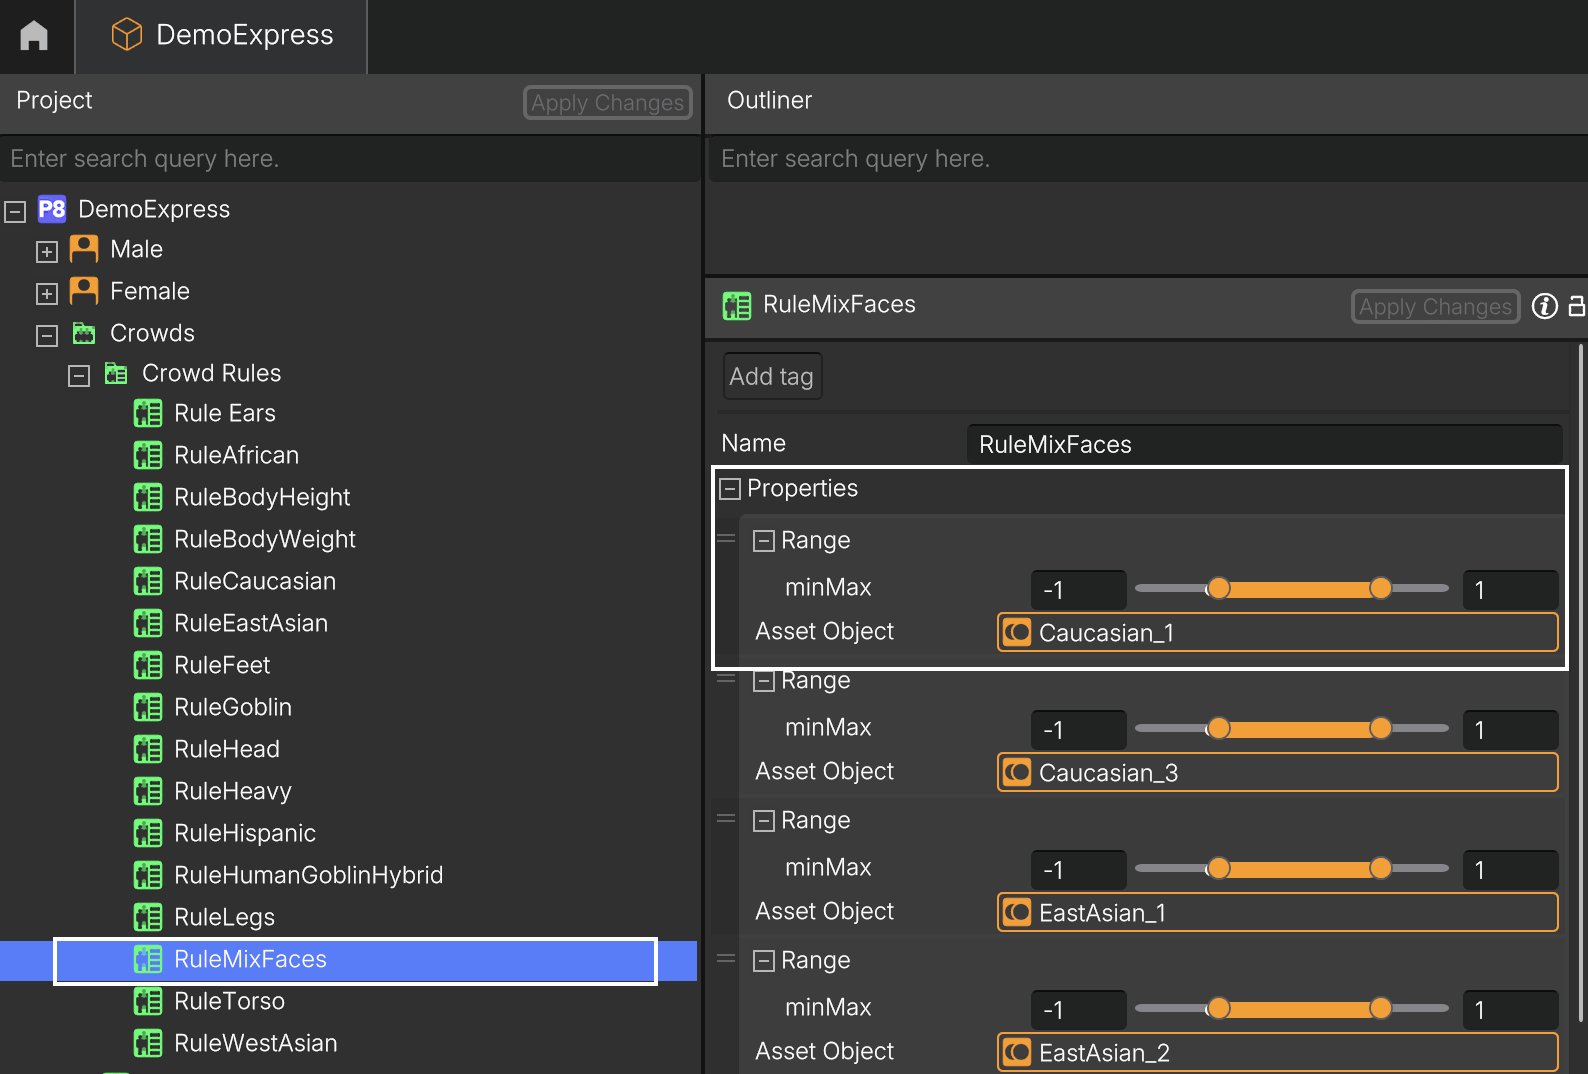
Crowd rule for facial variations
-
Now, you’re ready to use this rule in a Crowd! To apply it:
- Open your Crowd object.
- Drag the newly created Crowd Rule into the Crowd Rule Editor Graph.
- Link it to the Crowd, as shown below.
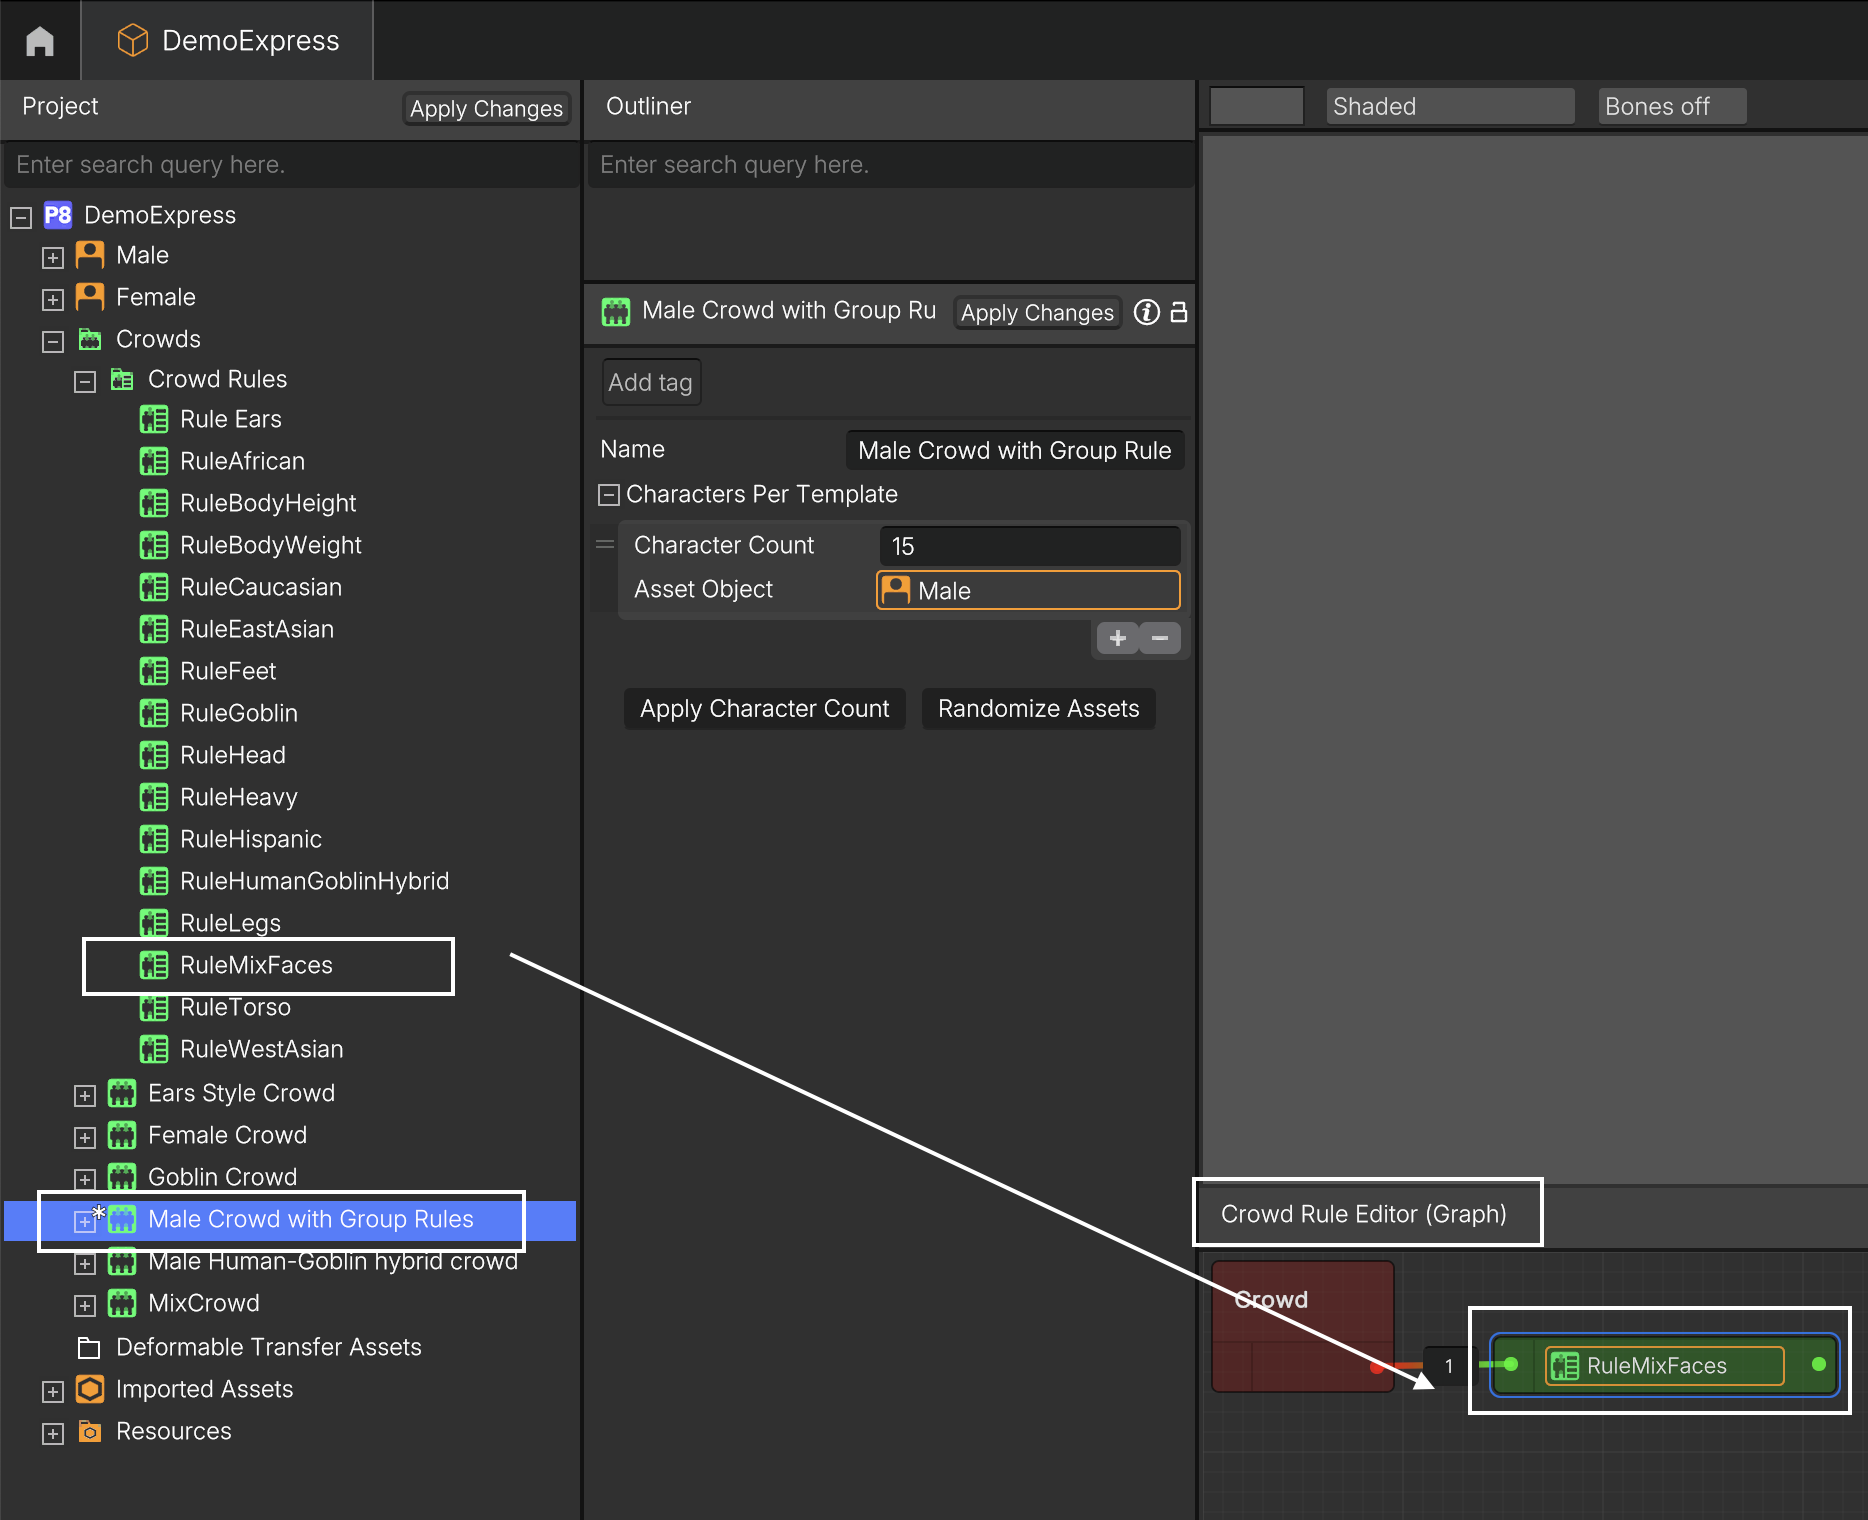
Linking a rule to the Crowd in the Crowd Rule Editor.
Any new rule linked in the Crowd Rule Editor will automatically update your Crowd!
You can now drag your Crowd to the Outliner and instantly see all the variations you've created!
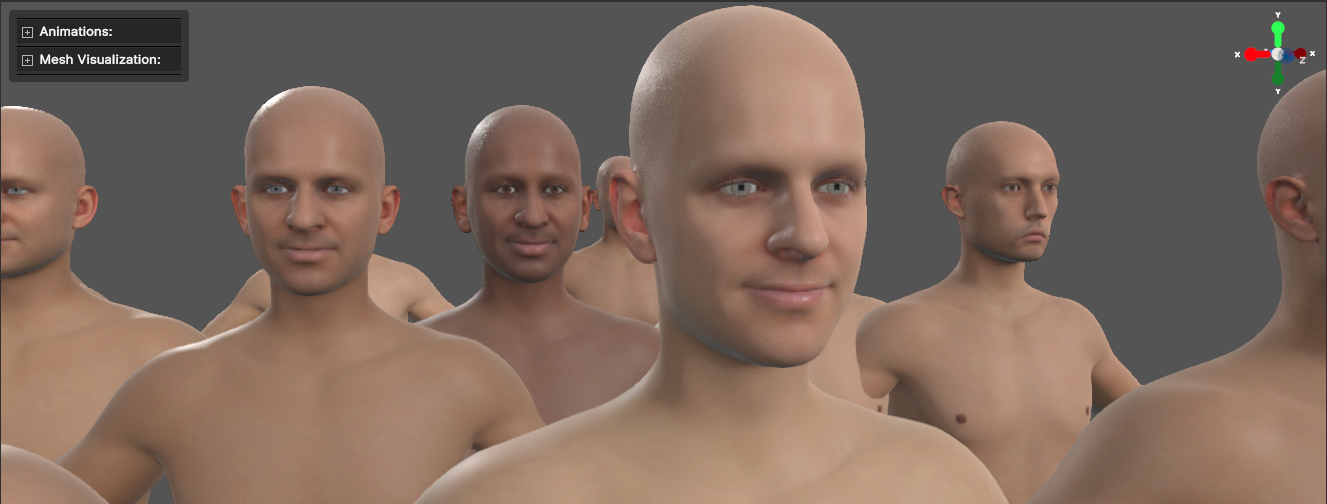
A Crowd with facial variations.
Crowd rules for height and weight variation
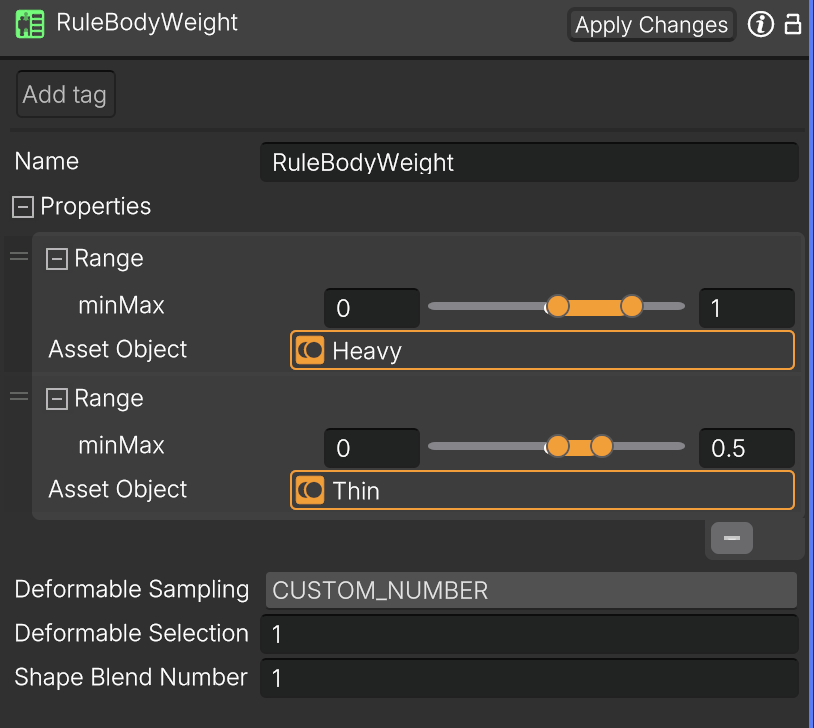
You can also create rules to achieve variations in body weight and height in your Crowd! You can create simple rules like the ones shown below, where we use two Shapes to create height variation (the Tall and Short Shapes) and weight variation (the Thin and Heavy Shapes).
Setting the Shape Blend Number to 1 will provide natural body variations in your Crowd.
| Crowd Rule for height variation | Crowd Rule for weight variation |
|---|---|
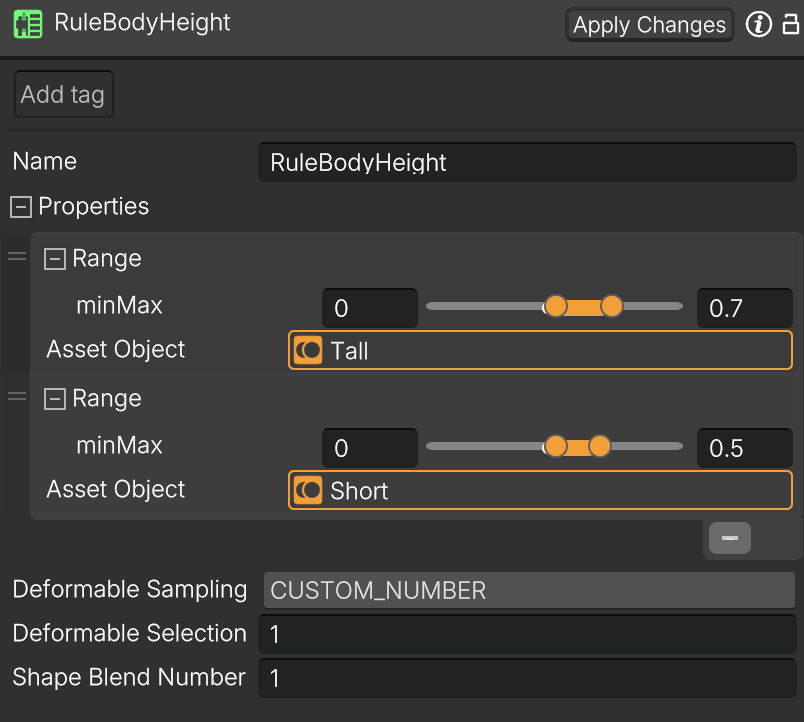 |  |
You can see below the effect of linking these two rules on the Crowd Rule Editor .

Adding the weight and height rules to the Crowd Rule Editor.
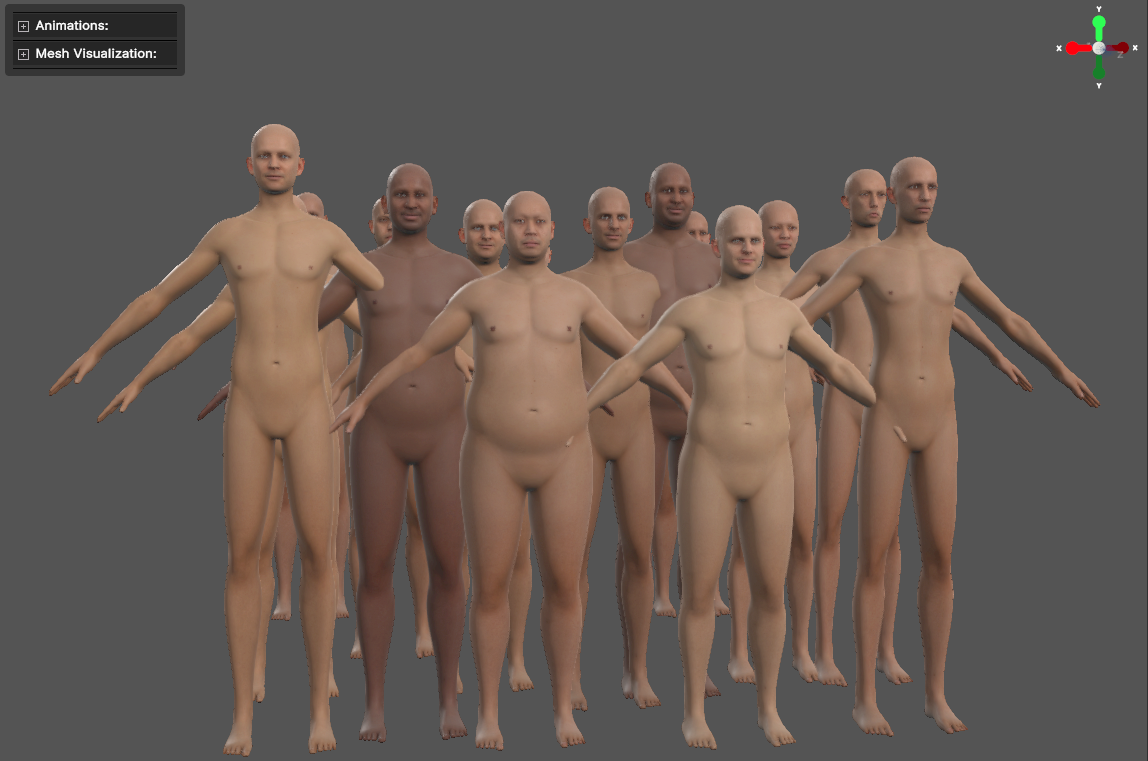
A Crowd with facial, weight, and height variations.
Crowd rules for distribution of deformables
You can create rules to distribute Deformables across the Characters in your Crowd using the same procedure as the body height and weight rules.
You can design separate rules to distribute Deformables for different body areas, such as the legs, torso, feet, head, and more—the choice is yours!

Adding a few rules to distribute Deformables in the Crowd.
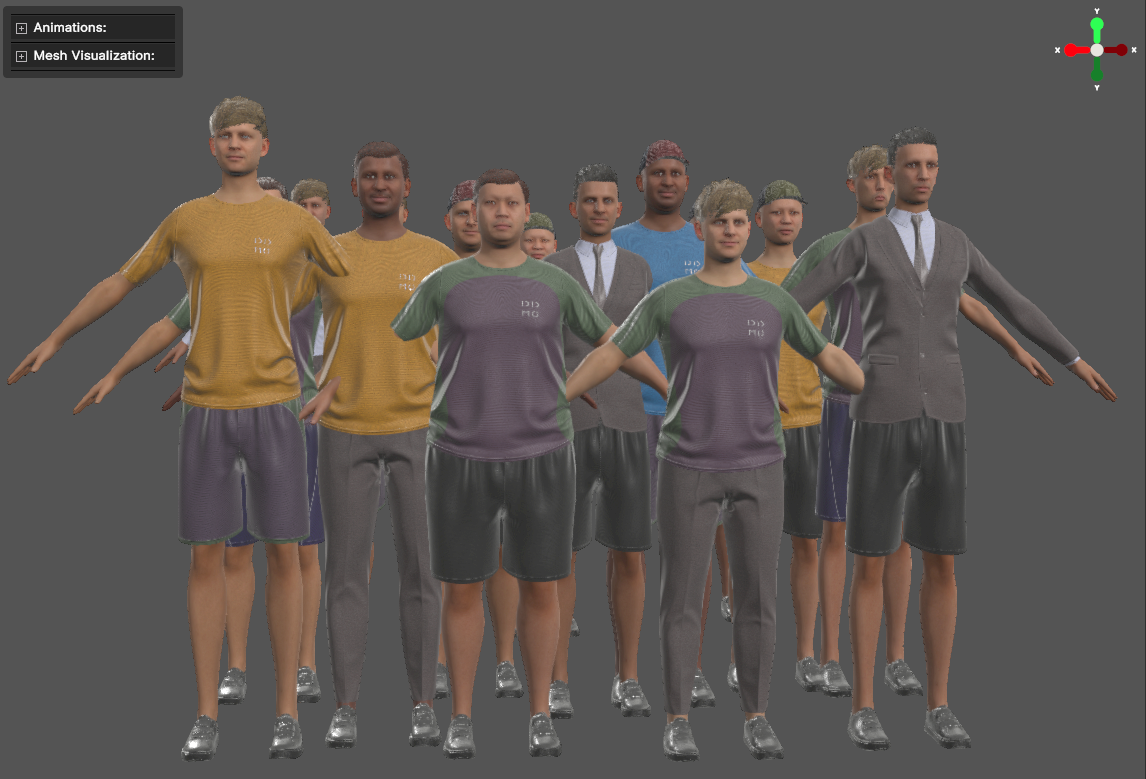
A Crowd with facial, weight, and height variations, and randomized Deformables.
The power of randomization
Not happy with how a Character looks? Want to tweak a specific feature—maybe make it a bit taller or adjust its proportions? Or perhaps the overall look of your Crowd isn’t quite right, and you’d like to try again. You can easily randomize either a specific Character from the Crowd or the entire Crowd with just a few clicks!
Tweaking traits of a Crowd Character
Randomize Crowd Character
Randomize a Crowd
Cross-Species Creations: Hybrid Crowds Unleashed
Why limit yourself to just head and body variations? Use the Crowd’s blending system as a creative playground to bring novel creations to life!
In DemoExpress, we created a hybrid Crowd by blending several human Shapes with a Goblin Shape to showcase the true power of blending. ⚠️ But be warned—with great power comes great responsibility! Be sure to fine-tune your Crowd rules to ensure the results match your expectations.
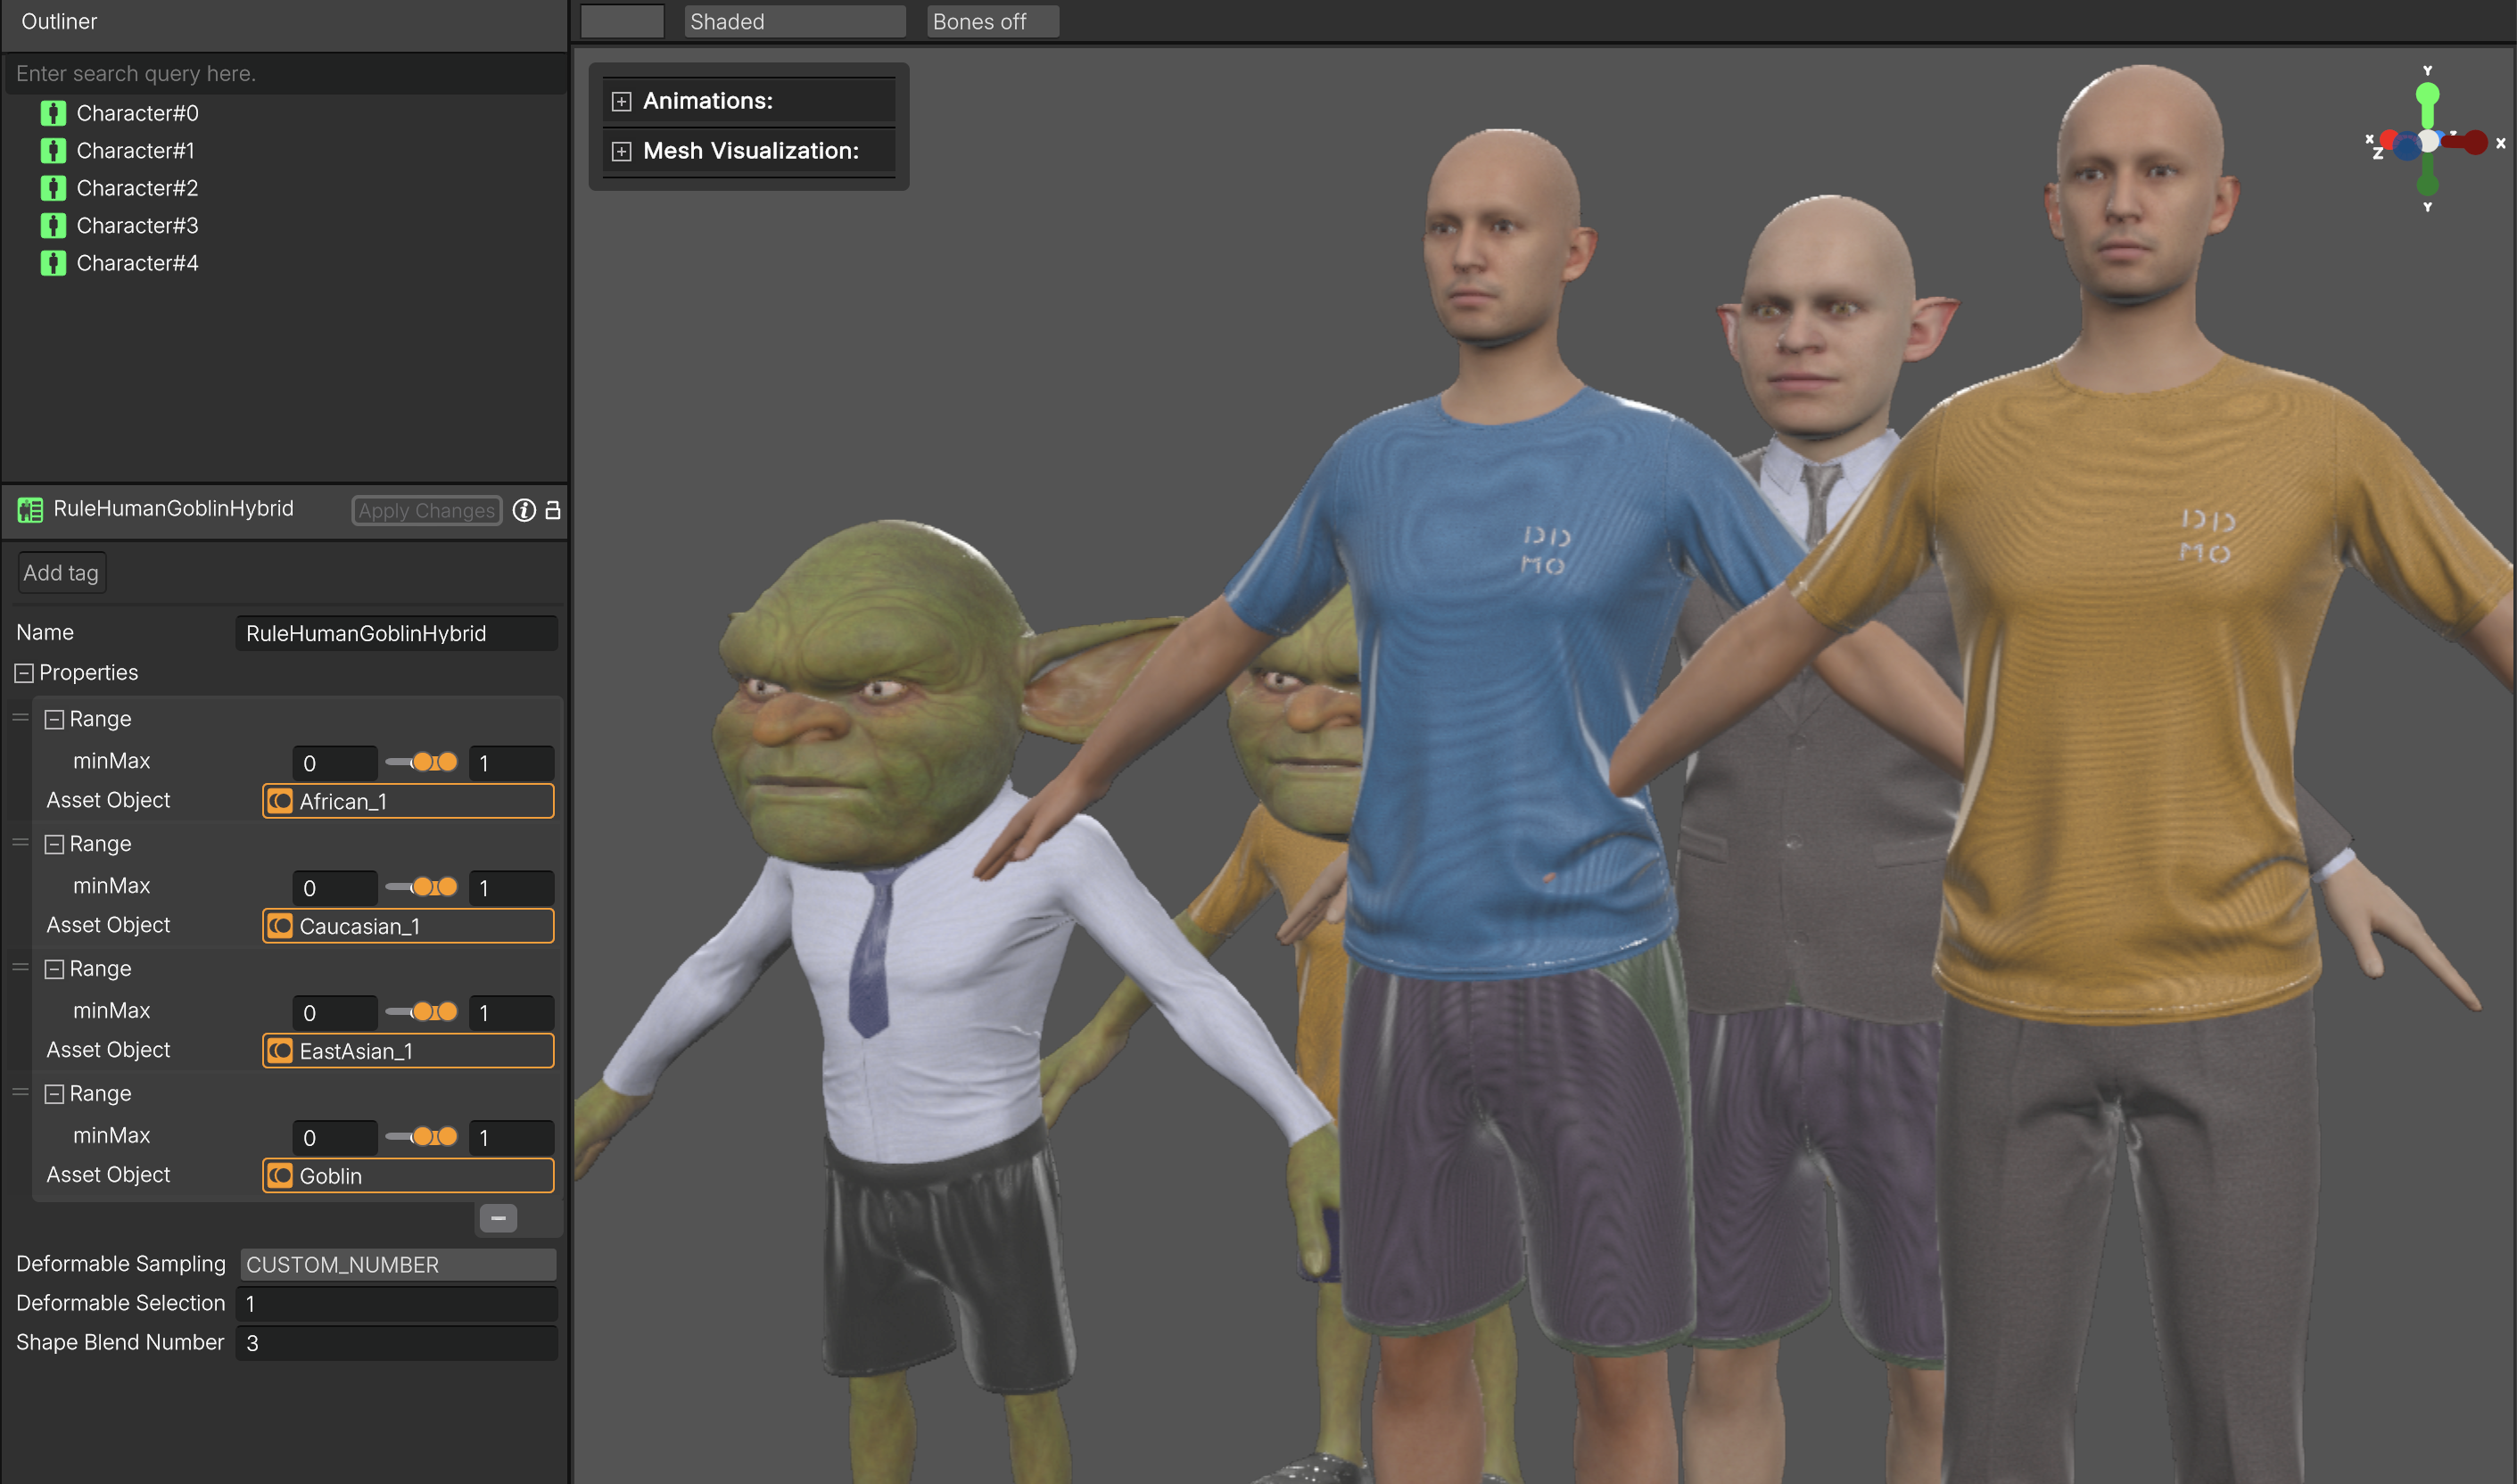
A crowd that blends human Shapes with a Goblin Shape.
Optimizing Crowds with Culling
Rendering large Crowds can be computationally expensive, regardless of your engine choice. To reduce this load, you can cull parts of the body of your Crowd Characters that are occluded by the Deformables assigned to each Character. (Note: Culls are not currently applied to assets outside of the crowds). To do this, you’ll need to define cull masks for each mesh of the Character, for each Deformable. Here’s how:
- Enter the intended Deformable under the Template.
- Create an item in the Cull Data section.
- Drag a cull mask to the Texture slot and assign the appropriate Template mesh to the Mesh slot.
- Repeat steps 2 and 3 for all meshes that need to be culled.
- Click Apply Changes when you're done.
Finally, enter a Crowd Character using the Deformable with the Cull Data applied to see the culling in action!
Assigning cull masks to a Deformable under a Template will propagate the culling information to the fitted Deformable on the Shapes, and will automatically be used in your Crowd Characters!
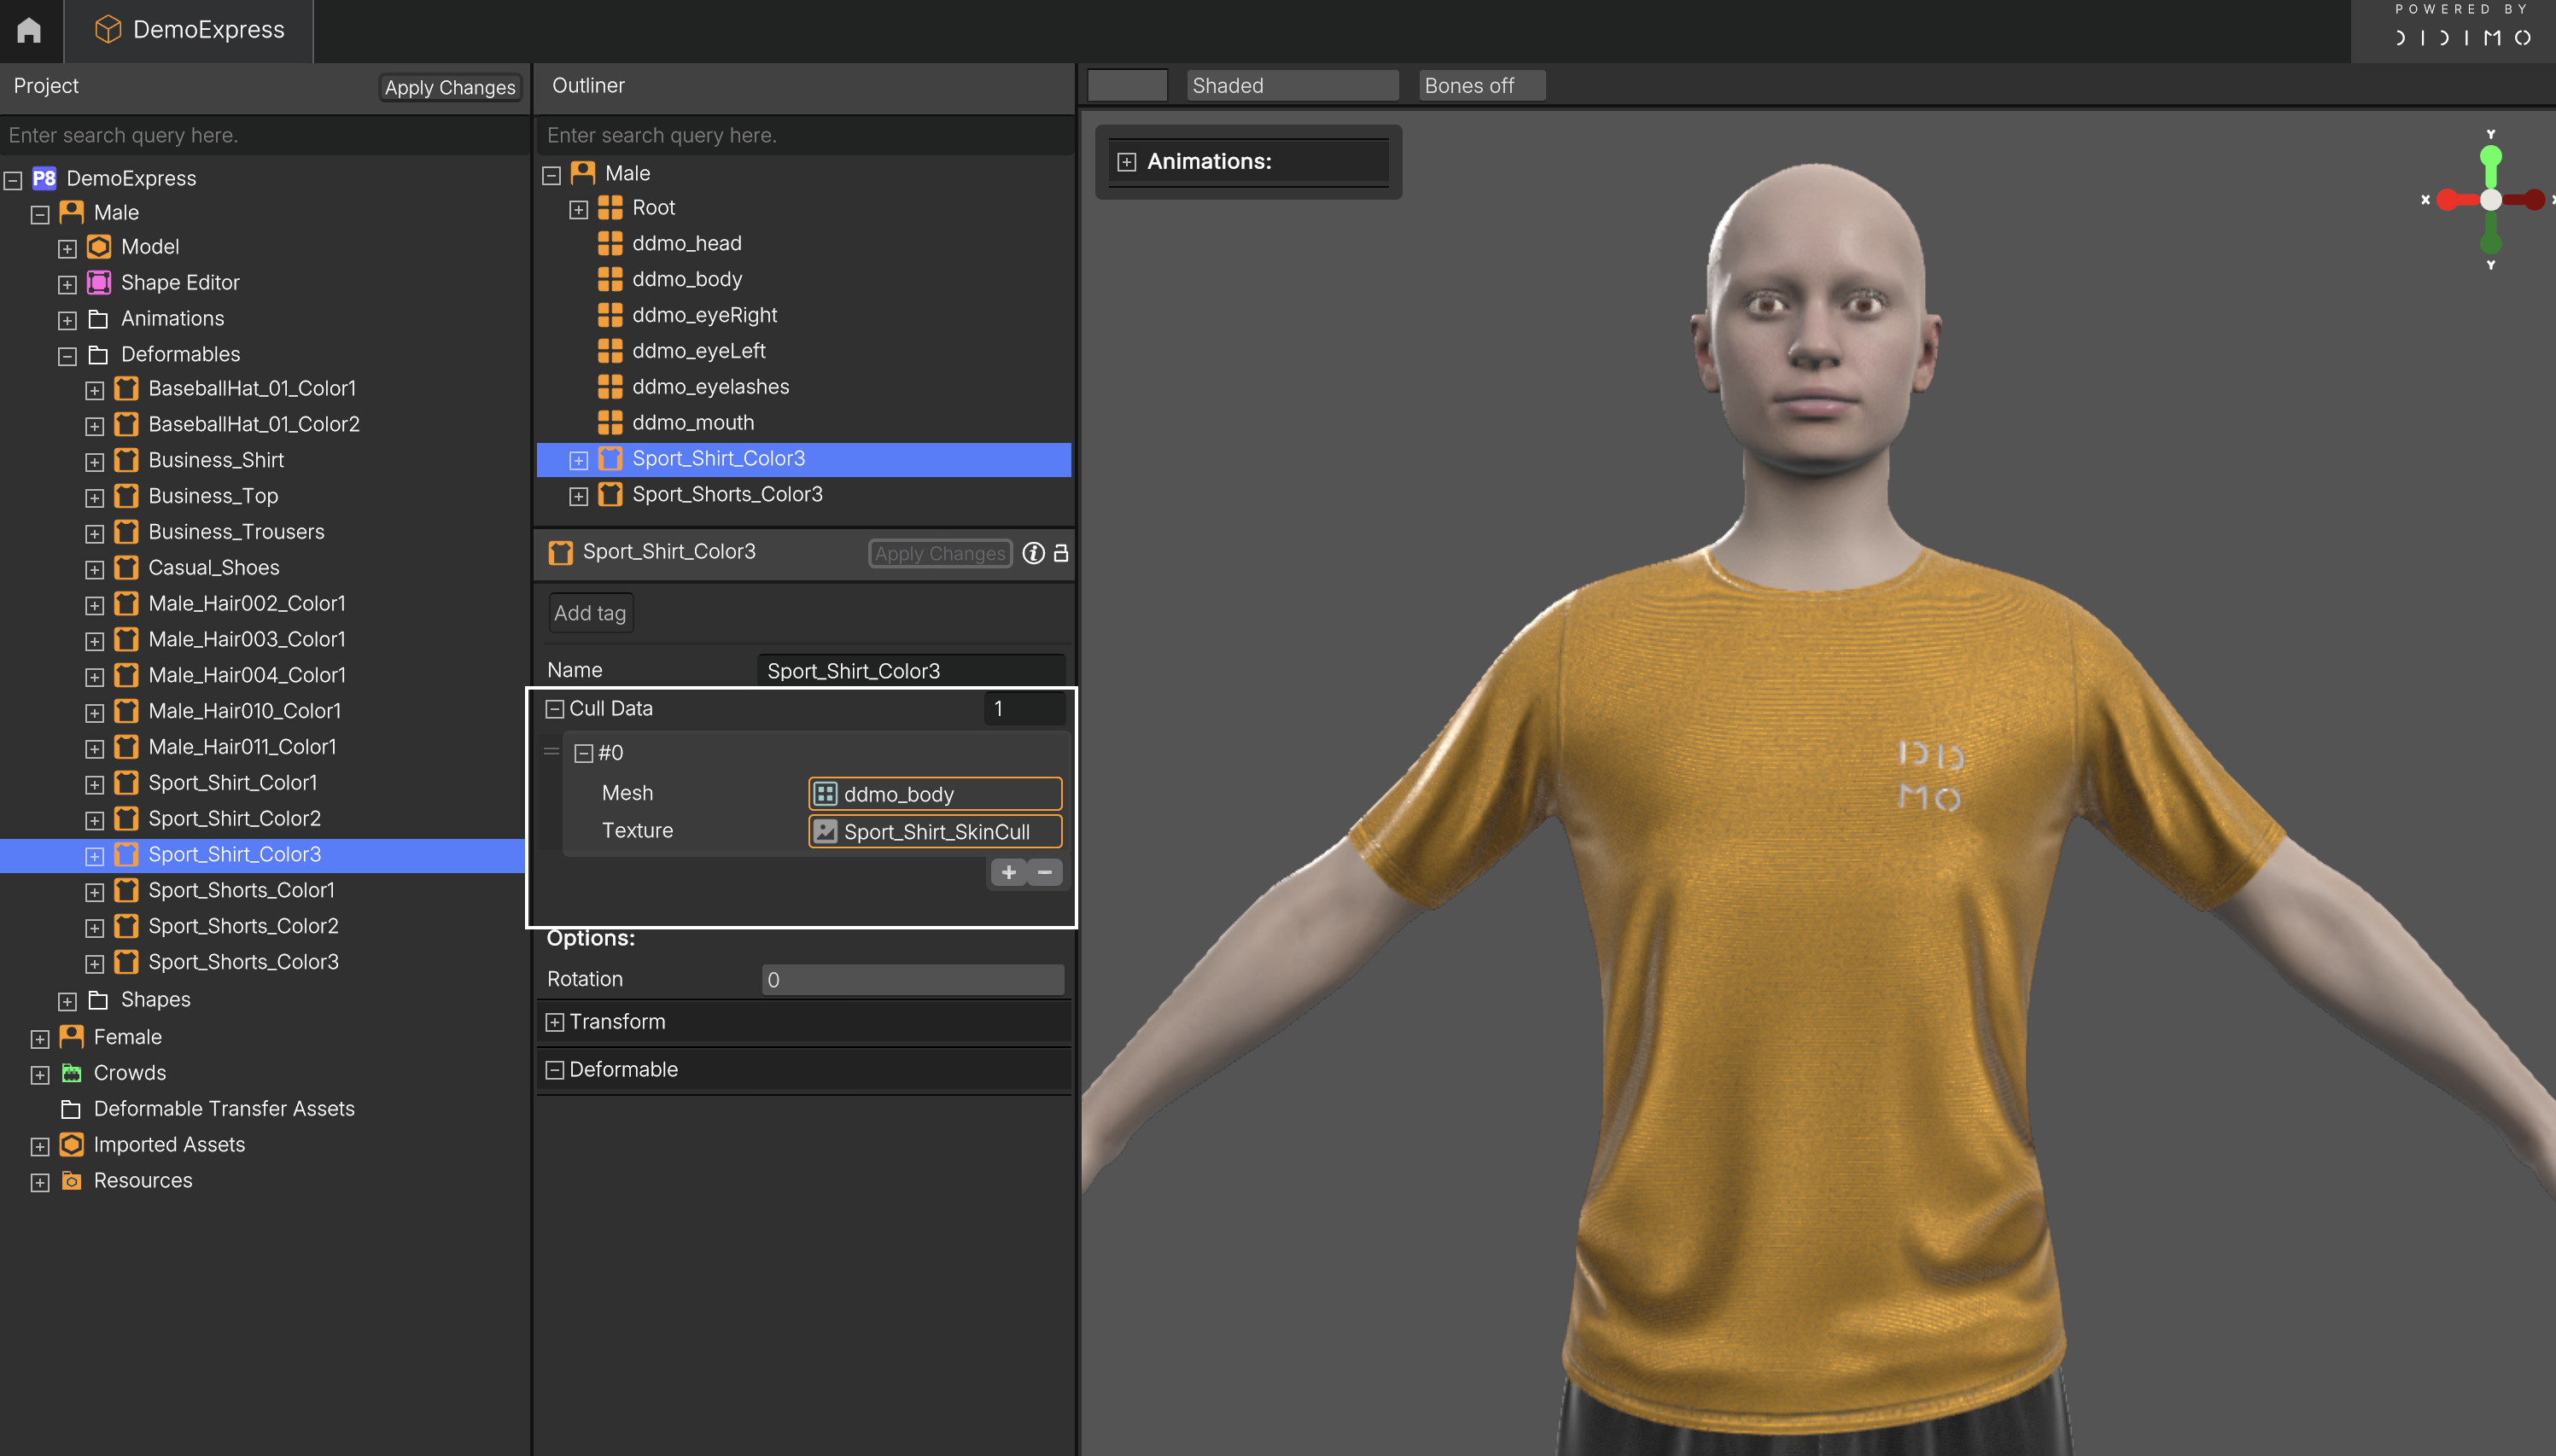
Assigning Cull Data to the body mesh of the Template on a specific Deformable.
Culling is also an alternative to solve intersections between a Deformable and a Shape/ Template in a Crowd!
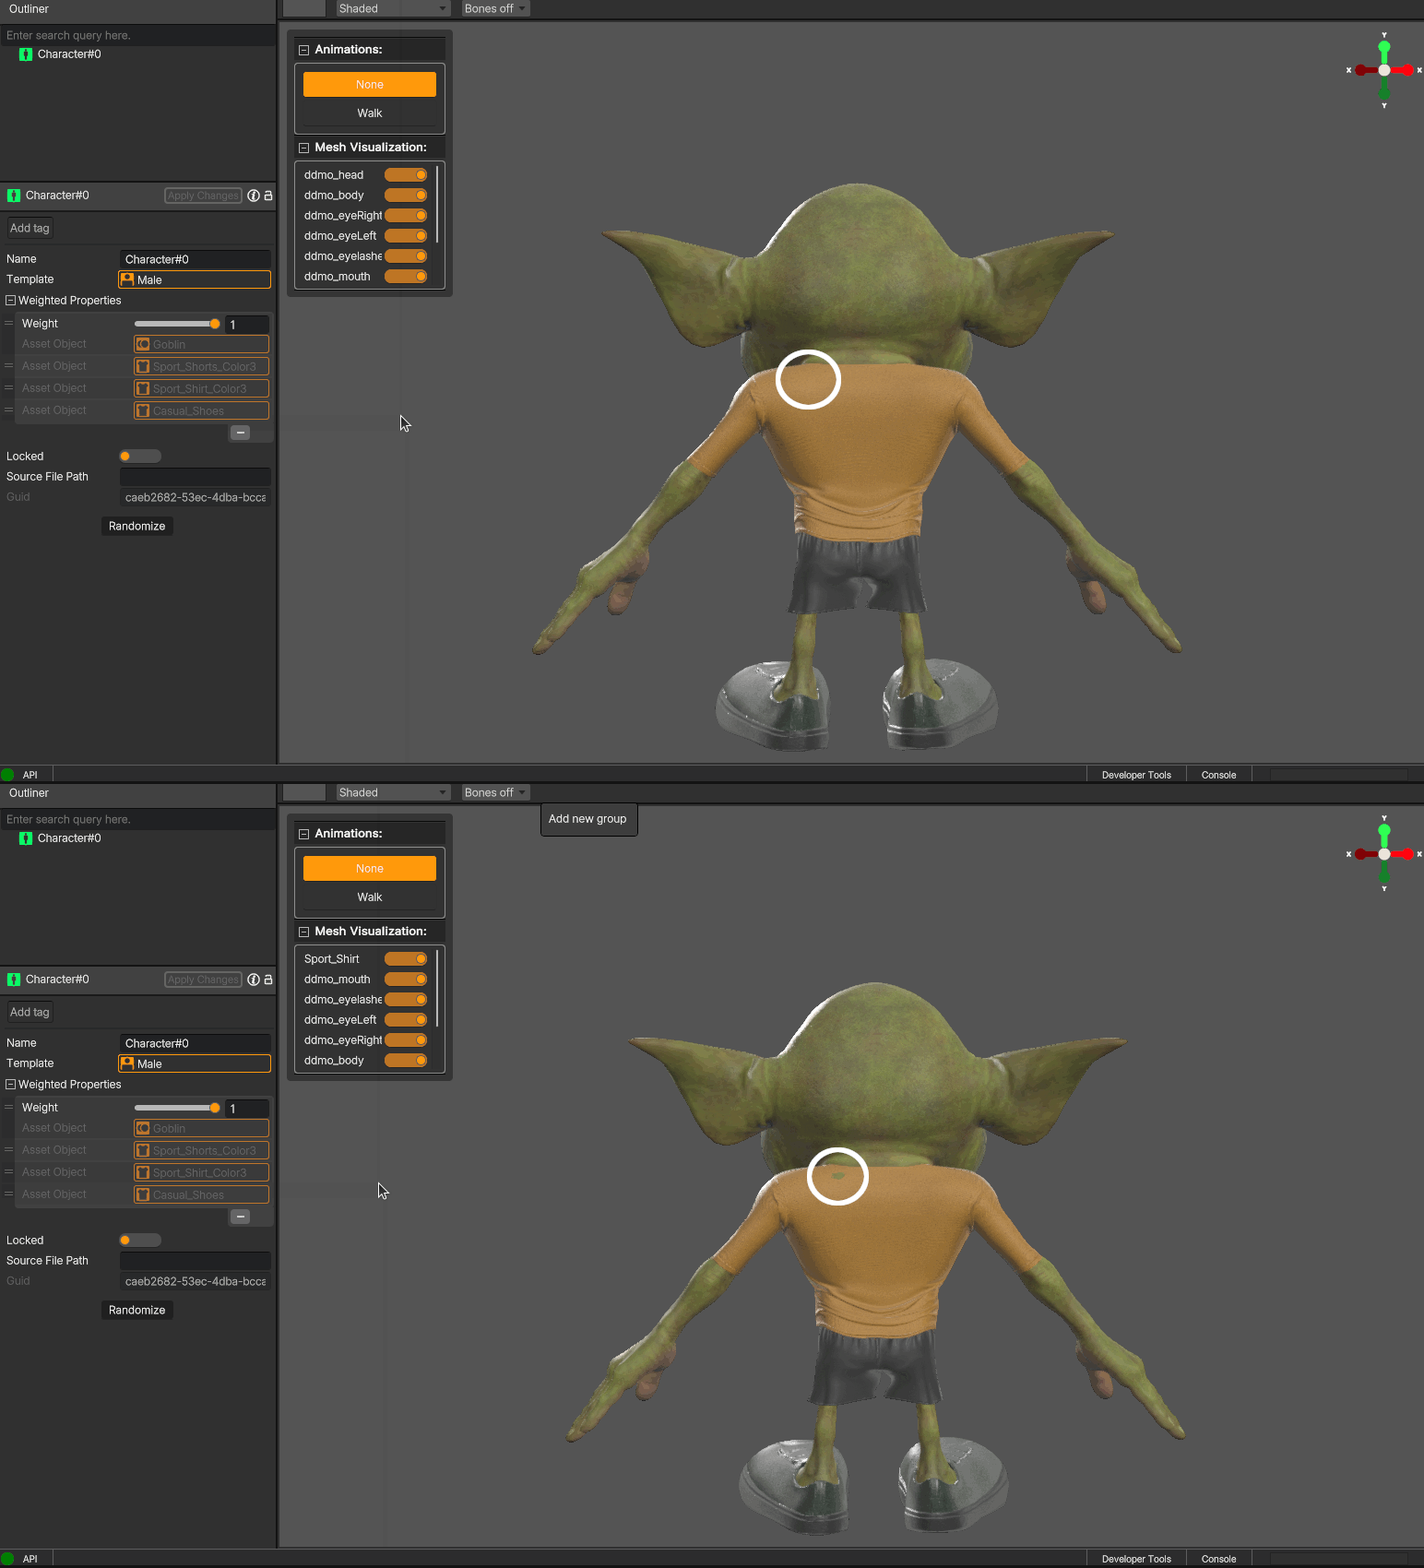
The effect of applying Cull Data in a Crowd Character.
Preview Animations
You can preview an Animation at any time on a Template, Shape, Crowd Character, or even an entire Crowd! Simply expand the Animation dropdown menu and select the desired item to see it play on-screen.
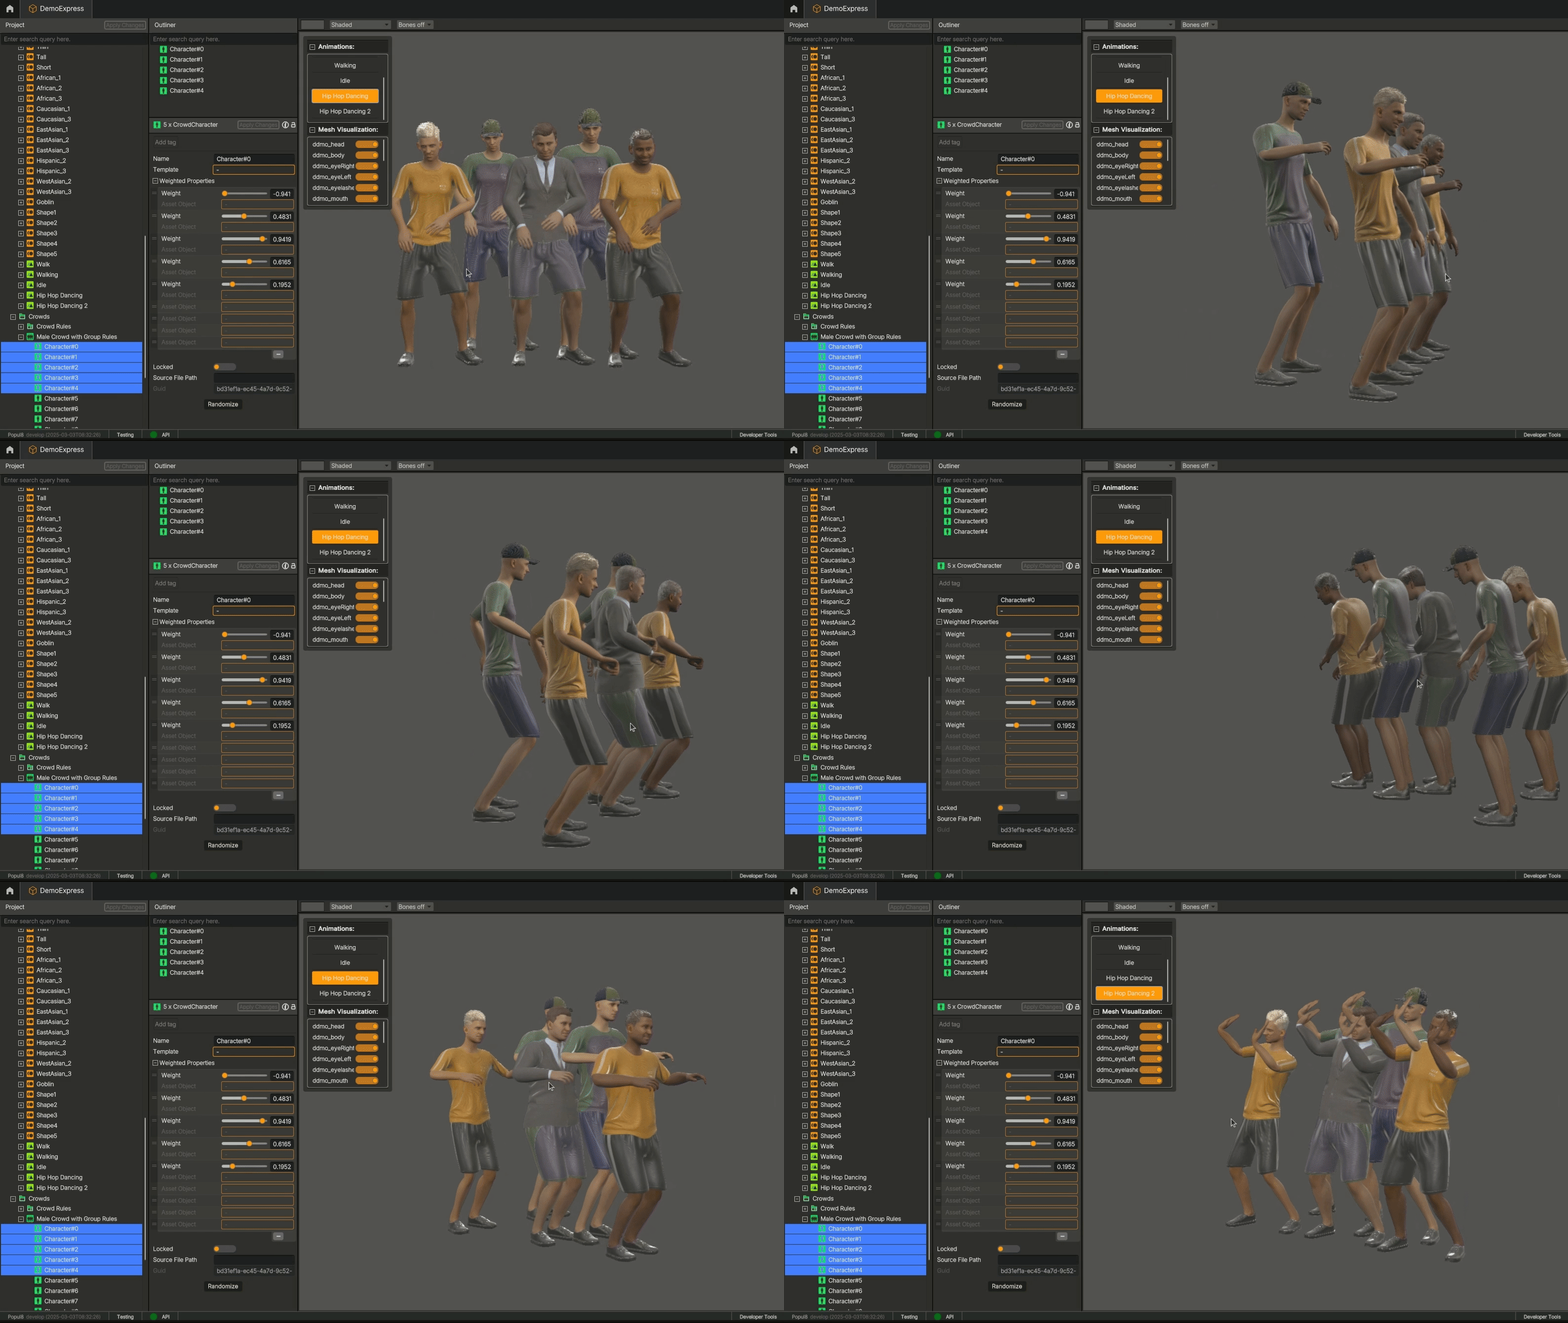
Animation preview on five Crowd Characters.
Export & Bridges
Once you're happy with the Crowds you designed you can export them in multiple ways:
- Bridge to:
- Export the Crowd files by right-clicking the Crowd and selecting Export as → Crowd.
- Export an individual Crowd Character by right-clicking the Character and selecting Export as → Single.
You can also export any Template, Shape, Deformable, and Animation by right-clicking and selecting Export as→ Model.
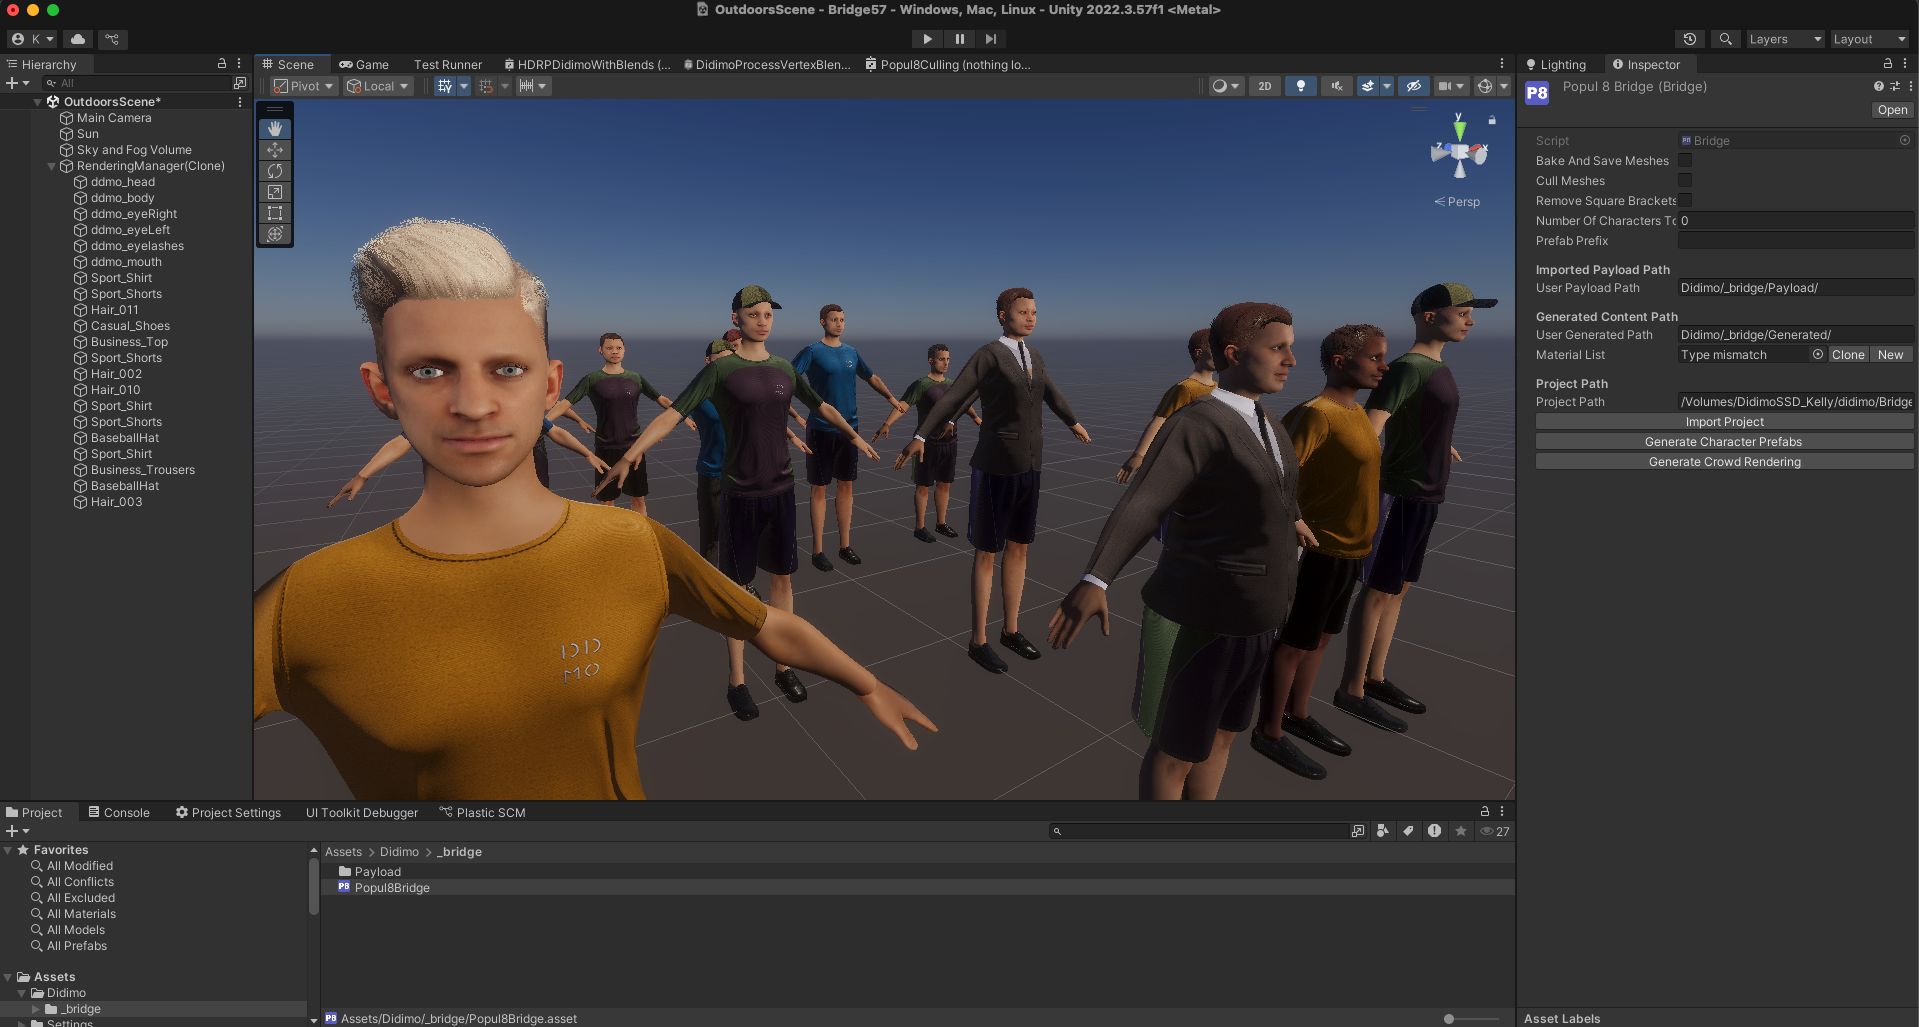
A Crowd exported to Unity through the Unity Bridge.
Updated 6 months ago
